I'm sure you've heard it before... food photographers (or professional photographers in general) telling you that you NEED to shoot with manual camera settings for food photography in order to level up your photo game.
You might be thinking, "well, that's great, but I don't know anything about manual!" Believe me, I've been there before. I understand it can be mega-confusing and even frustrating if you're trying to shoot with manual settings when you don't understand how shutter speed, aperture, and ISO work together.
If you've been shooting in auto or "scene" settings for a long time, you might be tempted to just continue on as you are. But I'm telling you, there is a better way! Once you make the effort to learn manual settings, the hardest part is behind you. You might be surprised how quickly you start to pick it up after playing around in your camera a little bit.
I created this post to help guide you as you learn how to shoot in manual settings for food photography. I break down shutter speed, aperture, and ISO and explain how they work together to create a perfectly-exposed photo, every time.

Manual Settings Overview
Before you can shoot with manual camera settings for food photography, it's important to understand what each variable affects, and how the three exposure variables work together.
Shutter Speed - shutter speed is how fast your camera shutter opens and closes.
Aperture - aperture, or "f-stop," controls how much light hits your camera's sensor.
ISO - ISO refers to your camera's sensitivity to light.
So, let's break these down in detail, shall we?
Shutter Speed
Shutter speed controls the amount of time your shutter is open, and how long your camera's sensor is exposed to light.
A fast shutter speed means your shutter opens and closes very quickly, which lets minimal light in and results in a darker image. In contrast, a slow shutter speed means your shutter is open for a longer period of time, and lets more light in, which results in a brighter image.
Not only does shutter speed affect the exposure of an image (how dark or bright it is), it also affects image sharpness. A faster shutter speed freezes motion, while a slower shutter speed results in motion blur.
First, let's look at how shutter speed affects exposure.
How Shutter Speed Affects Exposure
In the following examples, aperture and ISO remained constant while I took different shots, adjusting the shutter speed only. Take a look at how the brightness of the image changes as I increase the shutter speed.
The slowest shutter speeds (1/30s and 1/50s) are much brighter than the fastest shutter speeds (1/200s and 1/320s). The first image is heavily over-exposed, and it would be hard to recover the "blown-out" highlights. However, the last couple images are heavily under-exposed, and recovering detail in the shadows would be hard.

You always want to properly expose your shots "in-camera," meaning while you're shooting, rather than relying on editing software to "fix" the photos afterward. Of course, you might not always have proper conditions to expose perfectly, but getting as close as you can in those situations is as best you can do.
Shutter Speed and Motion
Now let's take a look at how shutter speed works with motion. The following shots are taken at three different shutter speeds.
The first shot, taken at 1/320s, is not nearly a fast enough shutter speed to freeze the dropping blueberry. Look how blurry the berry looks, and notice how fuzzy the edges of my fingers are, too. The second shot, taken at 1/500s is better, but still quite blurry.
The last shot, taken at 1/640s, freezes most of the blueberry as it drops to the pancakes. However, even this shutter speed is not fast enough to completely freeze motion.
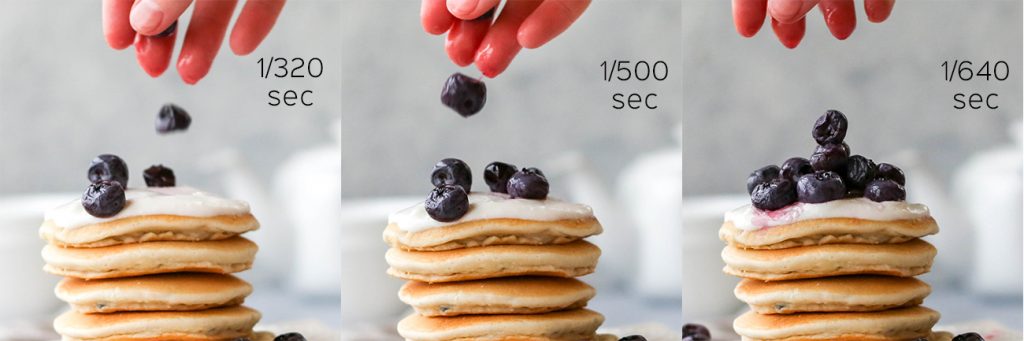
When shooting scenes that involve motion, such as a pour shot, drizzle, or dropping toppings like this, it's important to have a very fast shutter speed if you want to freeze the motion and have a tack-sharp image.
But remember, the faster your shutter speed, the less light comes into your camera. Remember the photos above? Your images get darker the higher your shutter speed becomes. That's why it's important to know how aperture and ISO are involved. Manipulating these settings can keep your image bright while allowing your shutter speed to stay high.
Let's talk about aperture first!
Aperture
Aperture, also known as "f-stop," controls how much light hits your camera's sensor. The smaller the aperture number, the more light that comes in, creating a brighter image. Aperture not only affects the amount of light hitting the sensor, but it also affects the depth-of-field of the image.
Don't worry if you're feeling a little lost by all the lingo. I will explain things more clearly! Let's take a look at how aperture affects exposure.
How Aperture Affects Exposure
In the following images, the shutter speed and ISO remain constant while I adjust the aperture for each shot. Notice how the images get darker as the aperture numbers get higher. Remember, the lower the aperture, the more light comes in, and the brighter your image will be.

As you increase your aperture to a higher number, or f-stop, the image becomes darker. But remember, aperture doesn't just affect exposure. It also affects depth-of-field. Let's look at that next.
Aperture and Depth of Field
Depth-of-field refers to how much of your image is in focus. A shallow depth of field has a narrow plane of focus, meaning only a small amount of your photo is in focus (the subject), and the background is blurred.
A wider depth of field means most of your photo is in focus, including some parts or all of the background. Let's see it in action.
Note: I adjusted shutter speed, ISO, and aperture in the following images to get proper exposure for each shot. This allows you to easily focus on the depth-of-field changing.
Look at the first couple of images, with aperture f/1.8 and f/2.5. The focus is on the stack of chocolate cookies, but the background and foreground are very blurry. See the handle on the spatula and the outside edges of the plate? They are not in sharp focus at all.
Now look at the next two images, with aperture f/4.0 and f/5.6. The bowls in the background are a little sharper now, and the edges of the plate are less fuzzy. However, the handle of the spatula is still not quite in focus.
Finally, look at the last two images, with aperture f/10 and f/22. These are very high aperture numbers, meaning a lot of the scene will be in focus. The bowls in the background are very recognizable and sharp, and the handle of the spatula is not blurry anymore.

See how aperture can change the look of the images? A question I get sometimes is "how can I get my images to look so professional, with the background out of focus like that?" I think you can see how the answer to that question lies in adjusting your camera's aperture.
Hopefully, you're starting to understand manual camera settings a bit better now. But we're not done quite yet! ISO is the last variable we will talk about.
ISO
When people refer to ISO, they are referring to your camera's sensitivity to light. A low ISO number means your camera is not very sensitive to light, resulting in a darker image. Raising your ISO to a higher number increases your camera's sensitivity to light, resulting in a brighter image.
Typically, a low ISO number is preferable to a high number. The lower you can keep your ISO, the better. This is because you get more "noise" or grain in your images the higher your ISO goes. We'll talk about this more, but first let's understand how ISO affects exposure.
ISO and Exposure
In the following images, shutter speed and aperture were kept constant while I adjusted the ISO. Notice how the images get brighter and brighter as the ISO gets higher.

In situations where you don't have a lot of light coming into your scene, you may have to raise the ISO in order to get the proper exposure. However, raising the ISO too much can have some poor consequences, like noise.
What's noise? Let's talk about it.
ISO and Noise (Grain)
"Noise" is the term used to describe the grainy texture that happens when you raise your ISO too high. I wanted to demonstrate this to you, so check out the images below.
ISO 2500 is already a quite-high. Study the chocolate cookies and notice how they change from ISO 2500 to ISO 25600. Do you see how the cookies start looking more and more "fuzzy" as the ISO gets higher?
That's the result of noise. In fact, the cookies in the ISO 25600 shot almost look blurry because of the high amount of noise involved. This is why it's best to keep your ISO as low as possible!
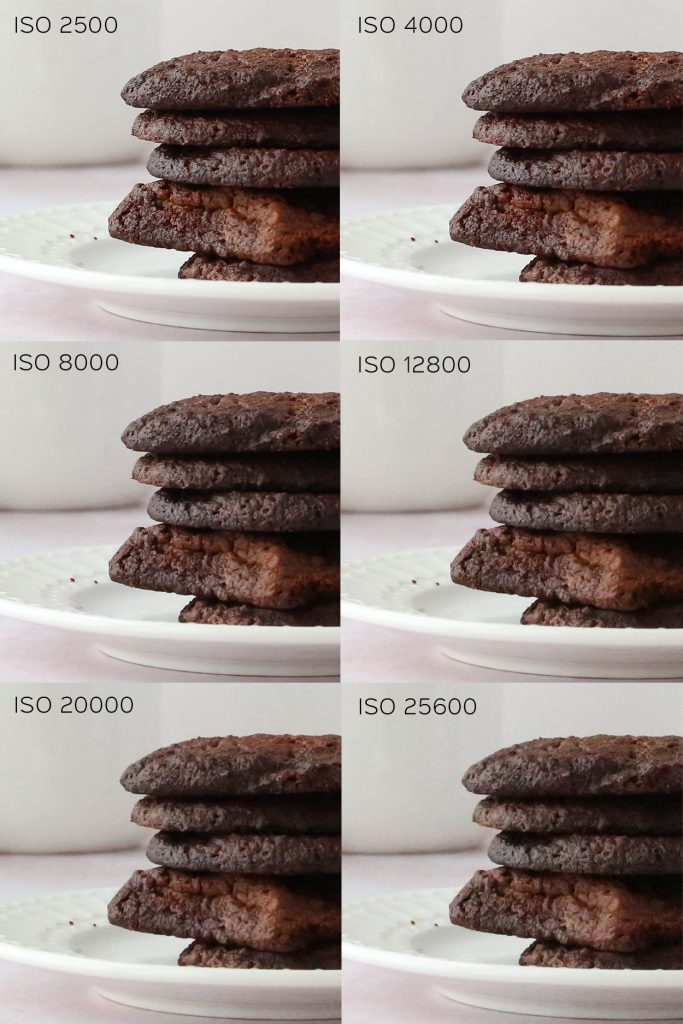
I will mention that higher-quality cameras handle high ISO better than entry-level, or older cameras. Some full-frame DSLRs handle high ISO levels really well, but it's still best practice to keep it as low as you can. For reference, the photos above are taken on my Canon 5D Mark iii with a 50mm f/1.8 lens.
Putting It All Together
So, how are you feeling after all this? Do you feel more confident about using manual camera settings for food photography? I know it's overwhelming when you're just learning. But the fact you're here reading this right now means you're eager to learn and you're taking the initiative to improve your food photography.
That is such a WIN!
Here are a few things to remember as we wrap things up:
Shutter speed can be adjusted to freeze motion.
Aperture can be adjusted to get a shallow or wide depth of field.
ISO can be adjusted to create a brighter or darker image, but be careful of noise.
The best advice I have for you after all of this is to jump right in! Understanding manual camera settings for food photography is wonderful, but you will learn most quickly if you grab your camera and start shooting.
You don't have to set up an elaborate scene to practice. You can shoot anything in front of you, manipulate the settings, and see how things change. I promise you, time spent with your camera is always time well spent. Especially when it comes to learning manual... the more you play around, the faster you'll learn!
A Final Word
If this was helpful to you, I'd love to know! If you still have questions or are confused about anything, please don't hesitate to shoot me a message. I'd love to talk with you and help you understand anything you're struggling with.
Don't forget to subscribe to my newsletter for more photography resources, delivered straight to your inbox! Follow me on Instagram to stay up to date and get lots of behind-the-scenes photography content. I always love sharing my photography tips with you!
very interesting subject , outstanding post.