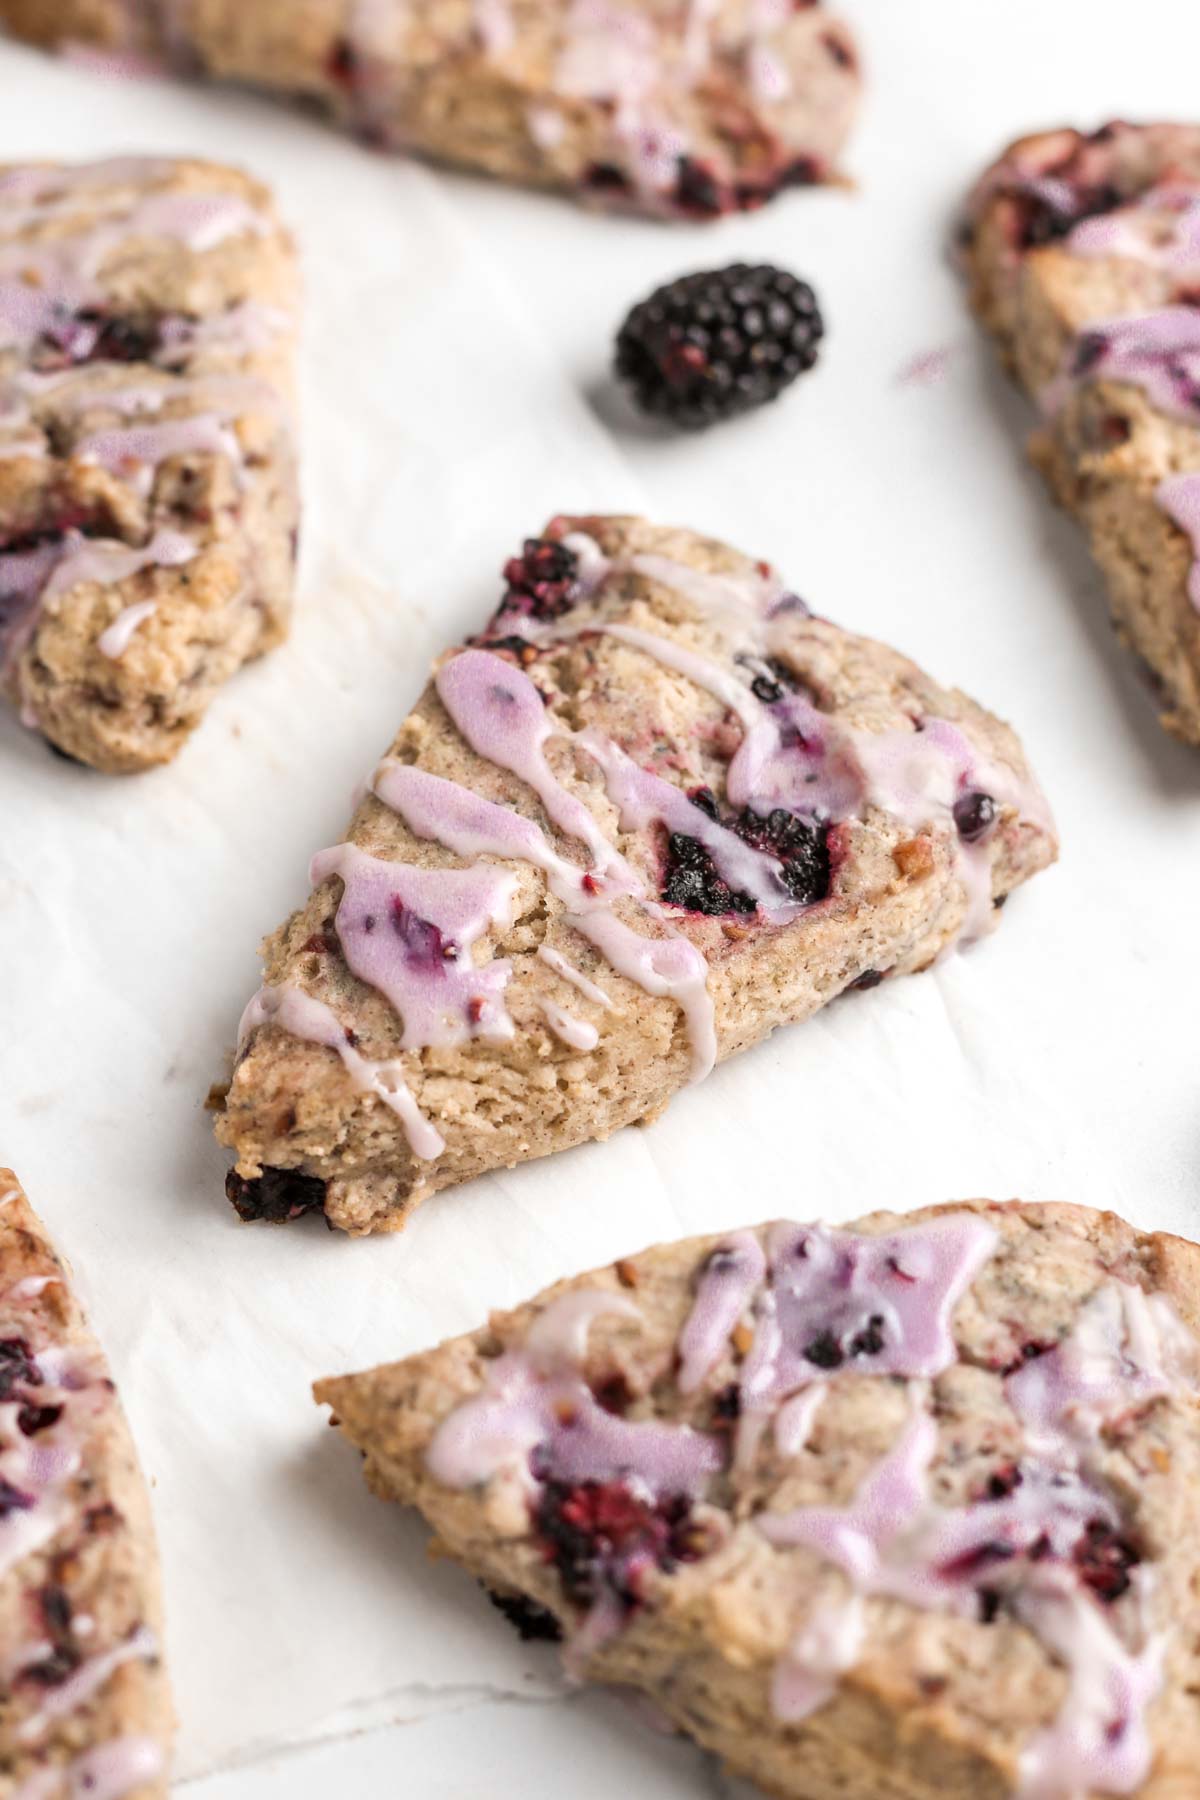
These vegan and gluten-free blackberry scones are super fluffy and soft. They are quick and easy to make and they're filled with fresh, juicy blackberries. Top the scones with a drizzle of blackberry vanilla glaze for a sweet bite that melts in your mouth. They are the perfect spring and summer treat!
These scones would be perfect for breakfast alongside an almond milk latte or for a light dessert after dinner. Your whole family is sure to love these, and your kids won't be able to tell that the scones are gluten-free and vegan because they taste so good! If you're looking for another healthy scone recipe, try these gluten-free matcha scones sometime.
Jump to:
Why You'll Love These Scones
- Vegan - These are vegan blackberry scones that are made without dairy or eggs.
- Gluten-Free - The scones are also gluten-free and safe for those with wheat allergies or celiac. Make sure to use gluten-free certified ingredients!
- Soft & Fluffy - The scones are super fluffy and have a delicious, soft bite. You don't have to worry about tough scones with this recipe!
- Quick & Easy to Make - You only need a handful of ingredients to make the recipe which makes it very quick and easy to make at home.
- Blackberry Vanilla Glaze - The scones are topped with a simple and delicious blackberry vanilla glaze that adds an extra pop of sweetness to the scones.
- One Bowl - You only need one bowl to mix the scone dough. You do not need a mixer either!
Ingredient Notes
You only need 10 healthy ingredients to make the scones and glaze. They are so easy!
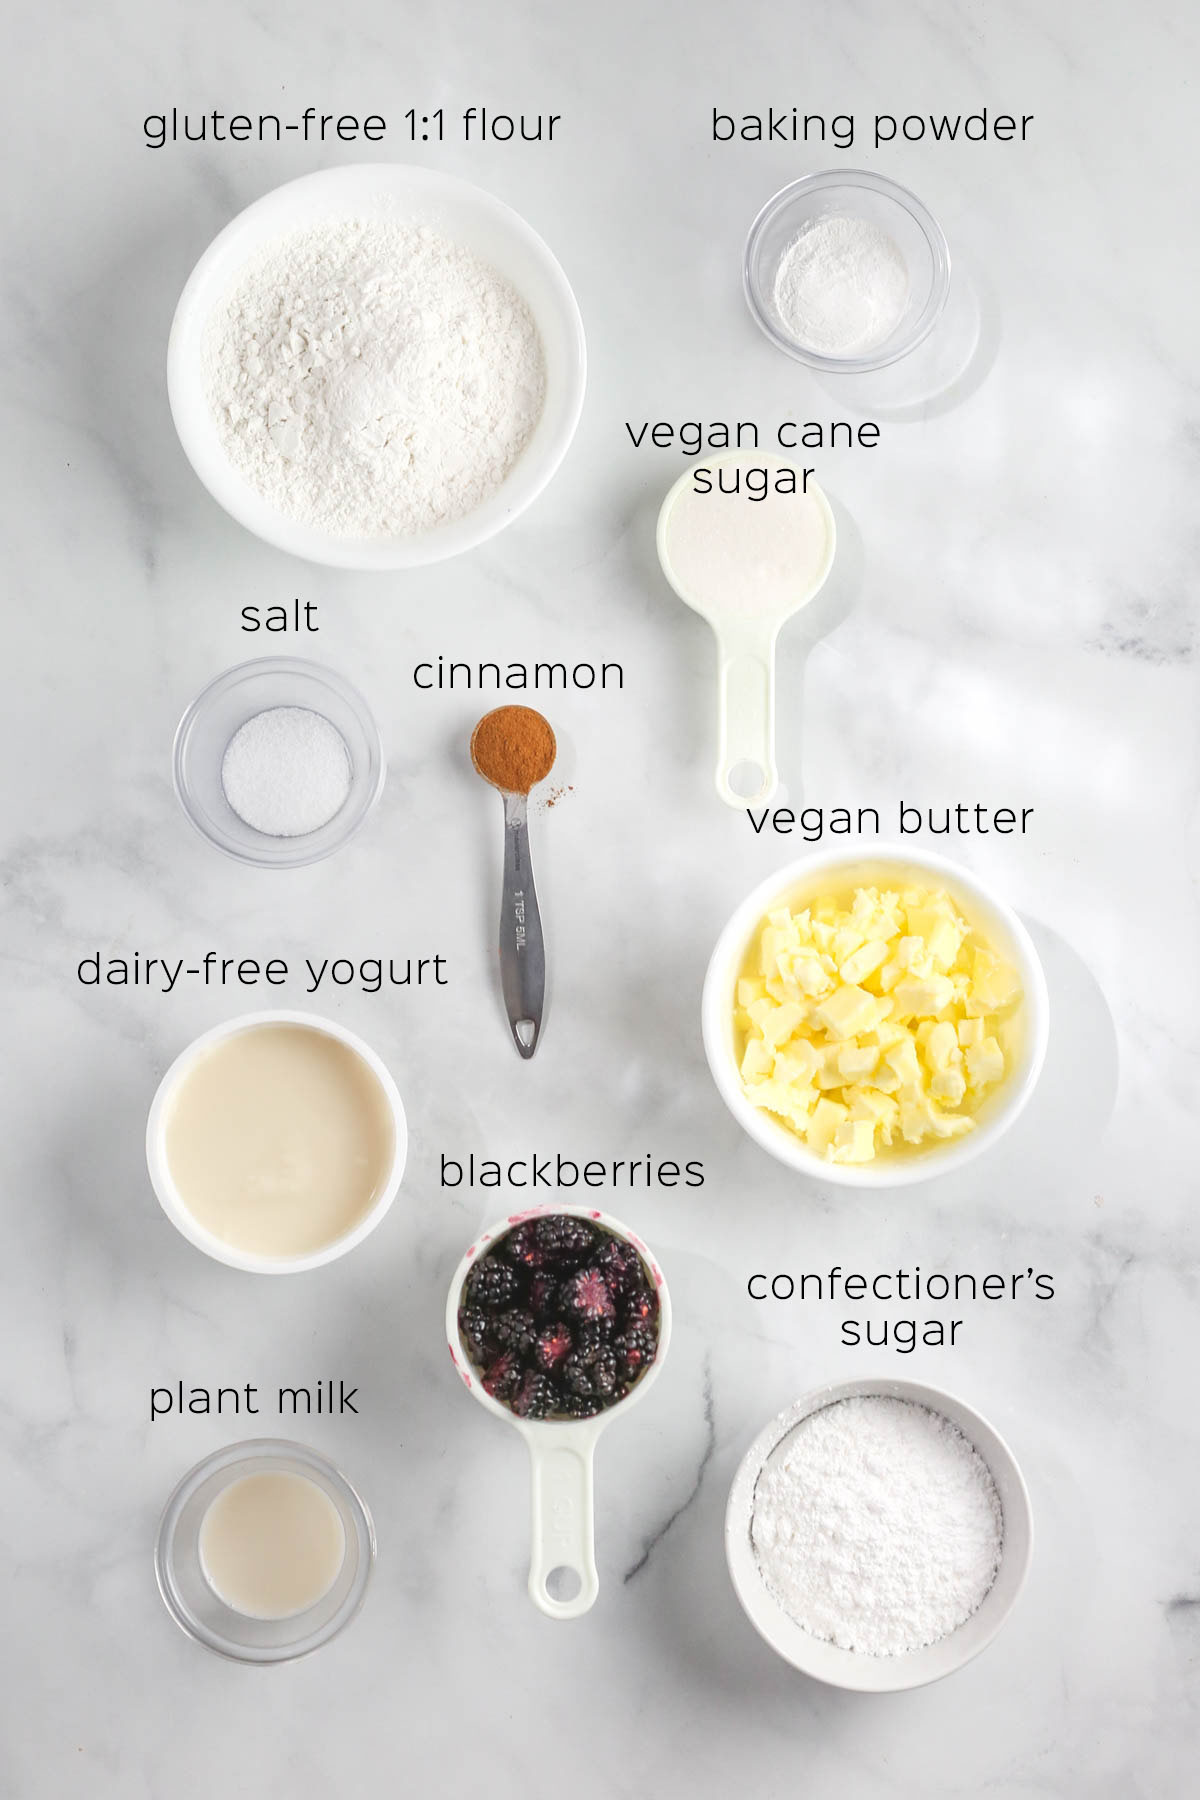
- Gluten-Free Flour: Make sure your gluten-free all-purpose flour blend contains xanthan gum. You may substitute all-purpose flour or white whole wheat flour if you aren't gluten-free.
- Vegan Cane Sugar: Use certified vegan cane sugar or granulated sugar. Wholesome has great sugar options that I like to use, including fair-trade cane sugar which is naturally vegan.
- Cinnamon: These aren't cinnamon-tasting scones, but a dash of cinnamon compliments the blackberries and adds extra flavor to the scone dough.
- Vegan Butter: Use room temperature vegan stick butter for best results, not the vegan butter spreads that come in tubs. Dice the butter into small cubes before using it in the recipe. If you're not vegan, use normal unsalted butter.
- Dairy-Free Yogurt: I used So Delicious vanilla coconut milk yogurt. Any dairy-free yogurt works, including plain yogurt or greek yogurt if you aren't vegan. Making scones with yogurt keeps them moist and soft.
- Blackberries: Fresh blackberries work best in this recipe. Cut them in half before mixing them in so they are bite-sized and not too large. If you use frozen blackberries, toss them in flour before mixing them into the dough.
- Confectioner's Sugar: This is for the glaze. I like Wholesome powdered sugar since it is vegan, but any confectioner's sugar should work.
- Plant Milk: Use unsweetened plant milk for best results. Almond milk, oat milk, coconut milk, and soy milk are all great options for the glaze. You can replace this with this water if desired.
Remember to see the recipe card at the bottom of the post for the full list of ingredients and quantities to make the scones.
Step-by-Step Instructions
You don't have to be a baking expert to make vegan scones. If you've never made them before, they are not as hard as they seem! Here are step-by-step instructions for making the blackberry scones:
STEP 1: Whisk together the gluten-free flour, baking powder, sugar, cinnamon, and salt in a large mixing bowl until evenly combined.
STEP 2: Use a pastry cutter or fork to "cut in" the diced vegan butter until fully incorporated with the dry ingredients and a crumbly, coarse mixture forms.
STEP 3: Stir in the dairy-free yogurt until a thick and sticky dough forms.

STEP 4: Very gently fold in the blackberries. Use a rubber spatula for this, or use your hands to gently knead the blackberries into the dough. It will be very sticky, this is normal!
STEP 5: Use your hands to form the dough into one big ball. Then place it on a sheet of plastic wrap and flatten it into a round disc, about 8-inches across and ½ inch thick. Place another piece of plastic wrap on top and place it in the fridge to chill for at least 30 minutes. This is necessary for the dough to thicken and become less sticky.
STEP 6: Once chilled, remove the dough from the plastic wrap and place it on a baking sheet lined with parchment paper.

STEP 7: Cut the circle of dough into 8 evenly-sized triangles, just like cutting pie or pizza. Then space the scones evenly apart on the baking sheet.
STEP 8: Bake the scones at 400 F for 28-30 minutes, or until they have become fluffy and the edges are lightly golden. Remove them from the oven and allow them to cool on the baking sheet for 10-15 minutes before transferring them to a cooling rack.
While you're waiting for the scones to cool, you can make the simple glaze.
Glazing The Scones
Making the blackberry vanilla glaze is super easy and only takes a couple of minutes.
STEP 1: Start by adding the confectioner's sugar to a small bowl with one teaspoon of plant milk or water.
STEP 2: Stir the ingredients together until all the sugar is dissolved and a glaze forms.

STEP 3: If desired, squeeze a few fresh blackberries over the bowl and let the juice drip into the glaze. The juice is a great natural coloring and creates a purple glaze. It is okay if a few chunks of blackberries fall into the glaze.
STEP 4: Stir the juice into the glaze until the desired color is reached. If the frosting is too thin after the blackberry juice is added, add slightly more powdered sugar to thicken it. If it is too thick, add slightly more plant milk ¼ teaspoon at a time.
Once the scones are completely cool, use a spoon to drizzle the glaze over each scone in a zig-zag motion or spread it evenly over the top of the scones for a thicker layer. Do this until all the glaze has been used. If you don't have enough, you can quickly mix more sugar and plant milk in a pinch.

Expert Baking Tips
- Measure flour properly - Many bakers over-measure flour without realizing it. Do not scoop your flour into the measuring cup; this packs the flour and can result in dry scones. Sprinkle the flour into the measuring cup with a spoon and then level the top with a flat edge to ensure you are not packing the flour into the cup. You may also use a baking scale for more precise measurements.
- Chill the dough - Don't skip this step! Chilling the dough is necessary for the flour to fully absorb the moisture in the dough. This makes it less sticky and much easier to work with.
- Don't crush the blackberries - Be very gentle when mixing in the blackberries. Because the dough is so thick, it is easy to crush the berries. Be careful not to over mix them; you only need to fold the dough 2-3 times.
- Slightly underbake the scones - Remove the scones from the oven after baking for 28 or 29 minutes to ensure you don't overbake them. Don't allow the edges to get brown, just slightly golden. This gives the best fluffy, soft scones.
Flour Substitutions
I have not tested the gluten-free blackberry scones with other flours. However, if you cannot use gluten-free 1:1 flour, I have tried to offer suggestions for using other flours instead. Please note that I cannot guarantee results when you make substitutions.
- Using Almond Flour - Almond flour has a much different texture than gluten-free 1:1 flour, so use caution here. If you use almond flour, you will need to add xanthan gum to the dry ingredients in order to provide proper structure in the scones, especially because they are vegan and do not have eggs to bind them.
- Using Oat Flour - I do not recommend using oat flour as a flour substitute. It can create dry and crumbly scones since oat flour does not provide much structure in vegan baked goods by itself. If you do try using oat flour, you may need to add an additional ¼ cup of flour to get the proper dough consistency.
- Using Plain Flour - You can use plain flour (also known as all-purpose flour) instead of gluten-free flour with good results, but they will not be gluten-free blackberry scones if you do this. However, this yields the best results compared to using almond flour or oat flour.
- Using Whole Wheat Flour - You may also use white whole wheat flour or whole wheat pastry flour in the scones. They will taste more bread-like rather than cake-like, and will not be gluten-free if you use whole wheat flour.
If you prefer baking with almond flour, you can try these almond flour banana muffins, almond flour lemon cookies, or this chocolate cake with almond flour.

Frequently Asked Questions
Traditionally, scones are not vegan. However, this recipe makes gluten-free and vegan blackberry scones. They do not contain eggs, dairy, or gluten.
Yes! You can freeze baked scones for up to 30 days in the freezer. Make sure they are in an airtight container like Tupperware or a freezer bag.
If your scones are crumbly, you might've over-measured your flour, creating dry scones. You also might've overbaked your scones, causing them to lose moisture and become hard and crumbly. Slightly underbake your scones to ensure they stay soft.
Yes, you can replace the plant milk in the recipe with water if you prefer. The glaze can be made with milk or water with good results.
Scones generally don't rise as much as muffins, cakes, or other breads. However, if your scones didn't rise at all, you might've added too much or too little baking powder, which is the leavening agent in the scones that helps them rise. If you put your scones in the oven before it reached 400 F, this could also interfere with a proper rise because it affects the leavening agent, too.
Storing & Freezing Instructions
Store leftover scones in an airtight container at room temperature for 3-5 days. You may also keep them in the fridge. Consider reheating them in the microwave for a few seconds to enjoy a warm scone later.
Freezing Scones
You can freeze baked scones in an airtight container in the freezer for up to 30 days. If stacking the scones, be sure to place parchment paper between each layer to prevent them from sticking to each other.
To thaw frozen scones, allow them to sit out at room temperature for 2-3 hours before enjoying them again. You can reheat them in the microwave to accelerate the thawing process and enjoy a warm scone upon reserving. It is best not to re-freeze them after thawing, or they will lose quality over time.
More Gluten-Free Recipes


Did you make these gluten-free blackberry scones? Please leave a star rating and review below! This supports me immensely and helps other readers learn more about the recipe. If you post a photo of your scones on Instagram and tag me, I would love to share it. To keep up with the latest recipes, follow me on Pinterest and join my email list!
Recipe

Gluten-Free Blackberry Scones (Vegan)
Equipment
- 1 Large Baking Sheet
- 1 Large Mixing Bowl
- 1 Pastry Cutter
Ingredients
Blackberry Scones
- 1 ½ cups gluten-free 1:1 flour with xanthan gum
- 2 teaspoons baking powder
- ¼ cup organic cane sugar
- 1 teaspoon ground cinnamon
- ½ teaspoon salt
- ½ cup vegan butter, diced
- 5.3 ounces dairy-free vanilla yogurt or plain
- 1 cup fresh blackberries, halved
Glaze
- ½ cup vegan confectioner's sugar
- 1 teaspoon unsweetened plant milk
- ½ teaspoon blackberry juice optional for color
Instructions
Making The Scones
- In a large mixing bowl, whisk together the gluten-free flour, baking powder, cane sugar, cinnamon, and salt until combined.1 ½ cups gluten-free 1:1 flour with xanthan gum, 2 teaspoons baking powder, ¼ cup organic cane sugar, 1 teaspoon ground cinnamon, ½ teaspoon salt
- Add the diced vegan butter and cut it into the flour with a pastry cutter or fork until the mixture becomes coarse, pea-sized crumbs.½ cup vegan butter, diced
- Stir in the dairy-free yogurt until a thick, sticky dough forms.5.3 ounces dairy-free vanilla yogurt
- Gently fold in the fresh blackberries with a rubber spatula or use your hands to knead the dough and gently incorporate the berries. Do not over mix or crush the berries too much.1 cup fresh blackberries, halved
- Form the sticky dough into a ball and then flatten it into a round, 8-inch disc about ½-inch thick. Wrap it in plastic wrap and chill in the fridge for at least 30 minutes.
- Preheat the oven to 400 degrees Fahrenheit and line a baking sheet with parchment paper.
- Remove the dough from the fridge and cut the disc into 8 evenly-sized triangles (like cutting pie or pizza). Place the scones 1-2 inches apart on the prepared baking sheet.
- Bake the scones for 28-30 minutes or until the scones have risen and the edges are lightly golden. Allow them to cool for 10 minutes on the baking sheet before transferring them to a cooling rack.
Glazing The Scones
- While the scones cool, make the glaze. Whisk together vegan confectioner's sugar with 1 teaspoon of dairy-free milk. If desired, squeeze fresh blackberry juice into the glaze to color it purple, or add a drop of food coloring.½ cup vegan confectioner's sugar, 1 teaspoon unsweetened plant milk, ½ teaspoon blackberry juice
- Once the scones are completely cool, use a spoon to drizzle the glaze over the scones. Serve and enjoy!

FINALLY a good gluten-free scone recipe!! These scones came out perfectly fluffy and soft. Usually when I make scones they come out too dry and hard, but these are such a nice texture, especially for being vegan and gluten-free. My kids had no idea!! I made them for Easter today and they were a hit. Thank you! I used blackberry yogurt instead of vanilla which gave them extra blackberry flavor.
I love making scones and these blackberry scones turned out great. Perfect to use up extra summer berries!