Take your classic thumbprint cookies to the next level by making thumbprint cookies with icing! These are egg-free, gluten-free cookies filled with a delicious two-ingredient vegan icing. They have a soft, buttery texture that melts in your mouth. Natural food coloring makes the icing festive for any holiday, and adding sprinkles on top is the perfect finishing touch.
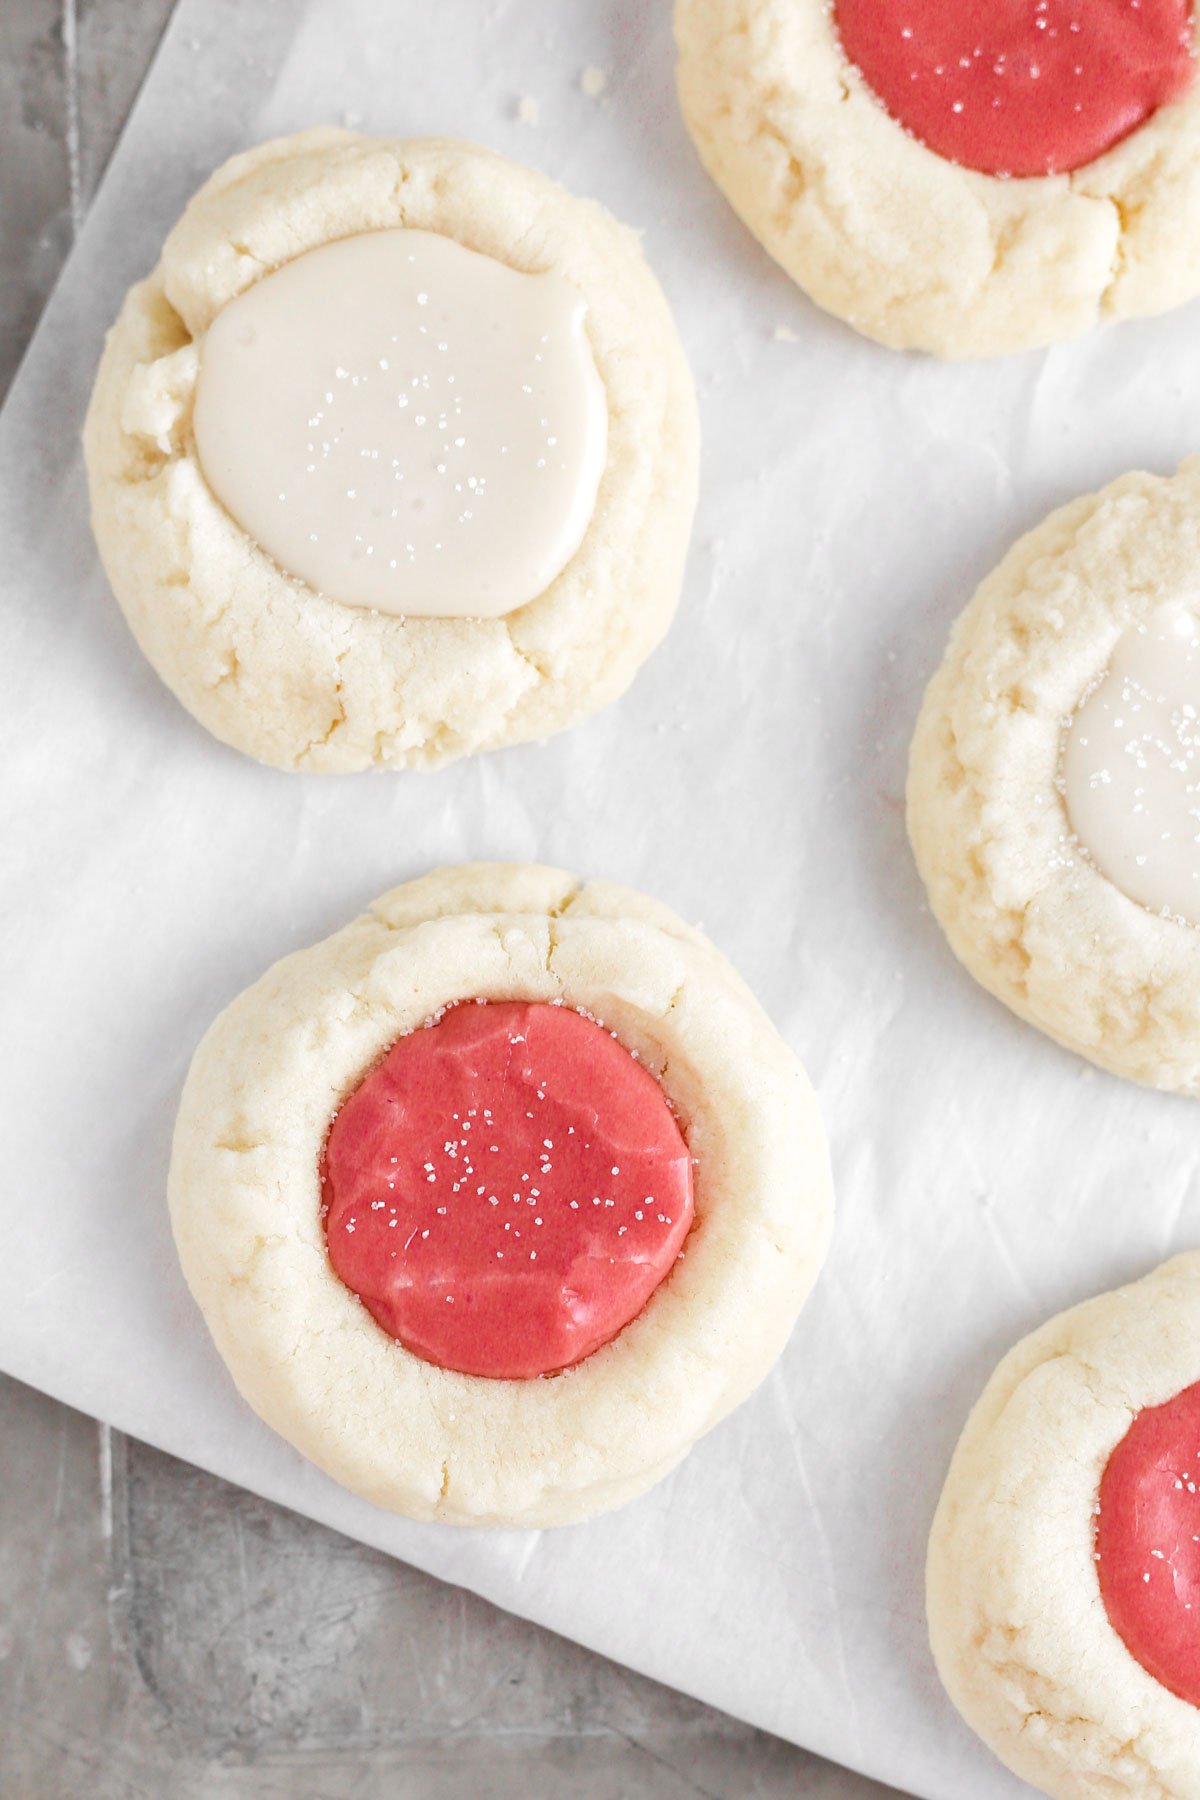
This recipe makes for the perfect gluten-free, dairy-free Christmas cookies that everyone is sure to love. They also make great easter thumbprint cookies if you use pastel icing colors. They are so easy to make and come together in less than one hour!
These gluten-free gingerbread cookies are another wonderful holiday cookie recipe that you might love. You can add these dairy-free sugar cookies to the list, too!
Jump to:
Why You'll Love These Cookies
- Easy To Make - These thumbprint cookies with icing are made with less than 10 ingredients and are ready to enjoy in less than an hour. So easy!
- Buttery, Soft Texture - The cookies melt in your mouth with their buttery soft texture. They are the perfect shortbread cookie!
- Gluten And Dairy Free - This recipe is gluten free and dairy free and safe for those with celiac, allergies, and dietary restrictions. They contain no nuts.
- Egg Free - These are eggless thumbprint cookies that are vegan and require no flax or chia egg. They are super simple to make.
- Fun Icing Colors - Customize the icing with natural food coloring to make festive thumbprint cookies for any holiday or occasion. They are perfect for Christmas!
Ingredient Notes
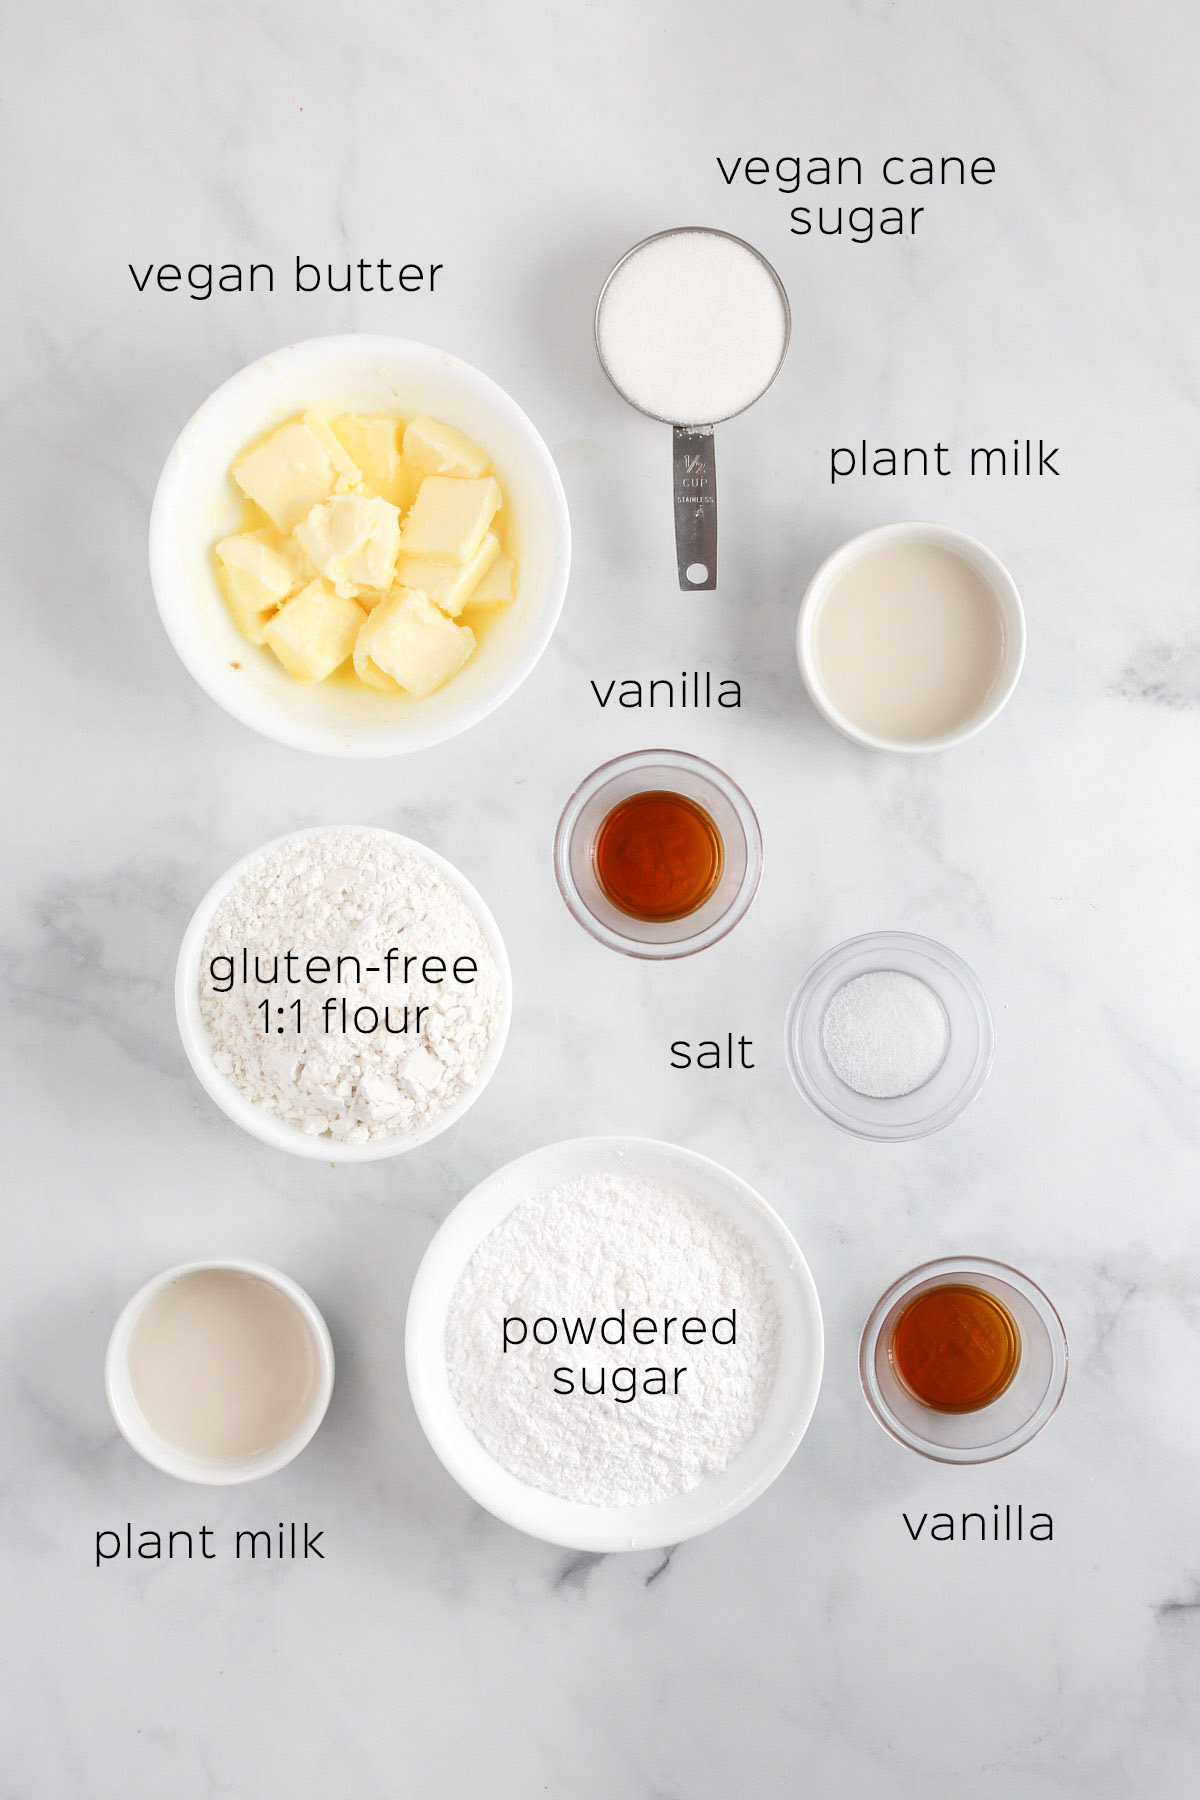
These cookies are made with a few simple, plant-based ingredients.
Here are a few important notes on some of the ingredients, as well as recommendations for substitutions if you need to make them:
- Vegan Butter: Any plant-based butter should work well in these cookies. I like Earth Balance or Melt butter best. You can also use solid coconut oil instead.
- Vegan Sugar: Use an organic, vegan cane sugar in these cookies to maintain a light and buttery texture. You can use coconut sugar if preferred, but the cookies will be a darker brown in color.
- Gluten-Free Flour: I recommend using a gluten-free 1:1 flour made with xanthan gum. Almond flour, coconut flour, or other nut flours won't work in this recipe. King Arthur has a great gluten-free 1:1 flour that I use often.
- Plant Milk: Any unsweetened plant milk works well in these cookies. I use almond milk since it is what I have on hand most often.
- Powdered Sugar: Be sure to choose a vegan powdered sugar that is not processed with bone char. Florida Crystals has a certified vegan powdered sugar option.
- Vanilla Extract: Pure vanilla extract adds a well-rounded flavor to the thumbprint cookies. It is optional in the icing because it will make it an off-white, cream color.
Step By Step Instructions
Making the cookie dough is super easy and comes together in just a few minutes. Here are step-by-step instructions for making the gluten-free thumbprint cookies:
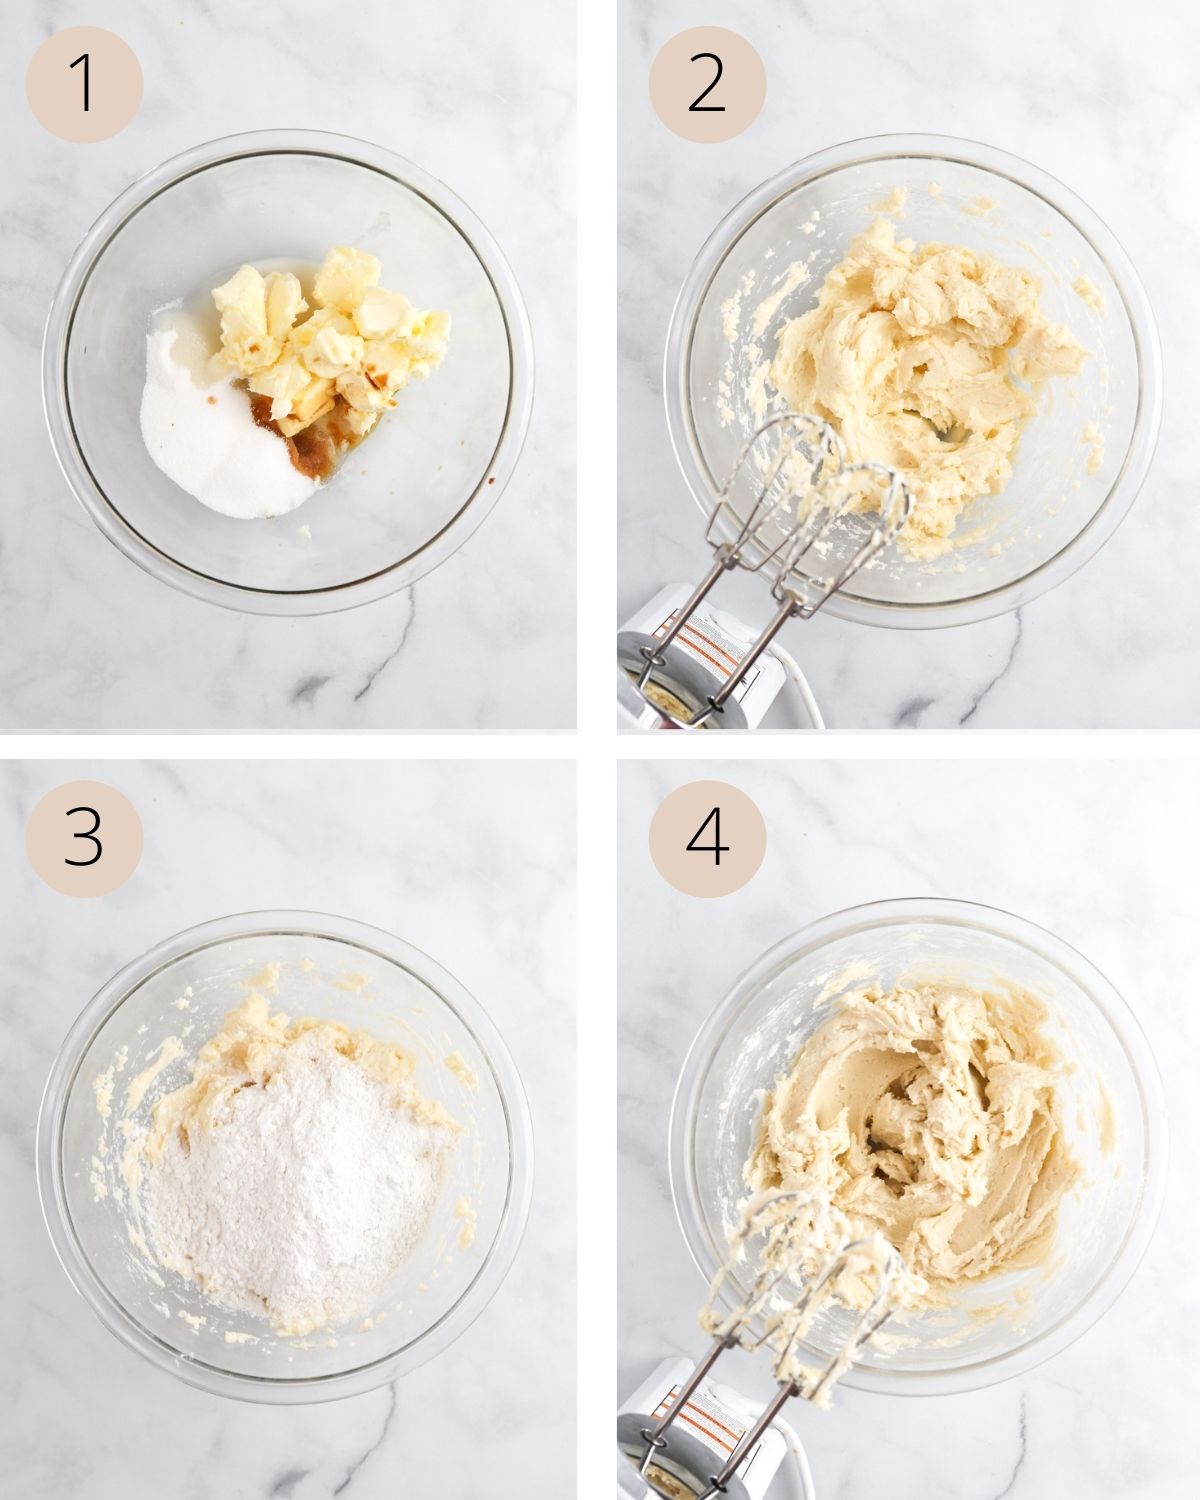
STEP 1: Beat vegan butter and sugar. In a large mixing bowl, use an electric hand mixer to beat together the vegan butter, vegan sugar, plant milk, and vanilla extract. Mix on medium-high speed until light and fluffy.
STEP 2: Add dry ingredients. At low speed, mix in the gluten-free flour and salt until a thick, sticky dough begins to form. Be very careful not to overmix, or the gluten-free cookies can become dry and crumbly.
STEP 3: Chill the dough. Cover the bowl of cookie dough with plastic cling wrap and place it in the fridge to chill for at least 30 minutes. Don't skip this step. Chilling is very important for gluten-free cookies because it allows the moisture to be fully absorbed by the gluten-free flour. This makes the dough much easier to work with, and prevents the cookies from spreading too much in the oven.
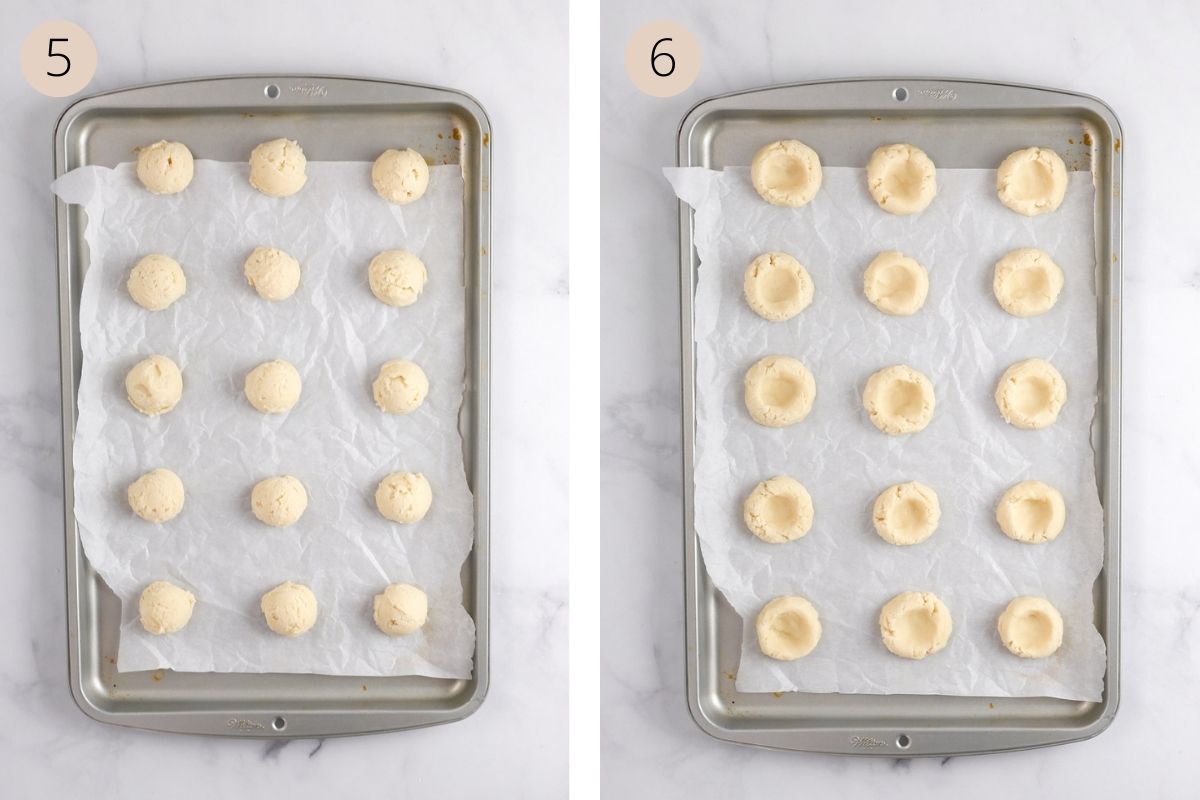
STEP 4: Scoop dough into balls. Once the cookie dough has chilled, use a small 1-inch cookie scoop to scoop the dough into evenly-sized balls. Place them on a baking sheet lined with parchment paper 1-2 inches apart.
STEP 5: Add thumbprint. Use your thumb to press an indent into the center of each thumbprint cookie. Try to make sure the cookies stay in a circular shape and don't become ovals. You can use your fingers to mold the edges of the cookies as needed.
STEP 6: Bake. Bake the thumbprint cookies at 350 degrees Fahrenheit for 12-14 minutes, or until the edges are set up and start to turn lightly golden. They should not become golden-brown; that is a sign of overbaking.
STEP 7: Redefine the thumbprints. As the cookies rise and spread in the oven, the thumbprint shape might become less defined. Once the cookies are removed from the oven, use the back of a teaspoon to redefine the thumbprint shape in the cookies. Then let the cookies cool on the baking sheet for 5-10 minutes to finish setting up.
TIP: Be sure to let the thumbprint cookies cool completely before adding the icing, or it will become a sticky, gooey mess and run off the cookies.
Icing The Thumbprint Cookies
The icing for the thumbprint cookies is super easy to make, tastes delicous, and is easily customizable with natural food coloring and sprinkles. The options are endless! Here are step-by-step instructions and helpful tips for icing the thumbprint cookies:
STEP 1: Whisk icing ingredients. Add vegan powdered sugar and plant milk to a mixing bowl and whisk it togther until a smooth icing forms. Then whisk in the vanilla extract if using. The icing should be just thin enough to drizzle, but not runny.
NOTE: Adding plant milk and vanilla extract to the icing will turn it an off-white, cream color. If you want perfectly white icing, it's best to leave out the vanilla extract and use water instead of plant milk for a true white color.
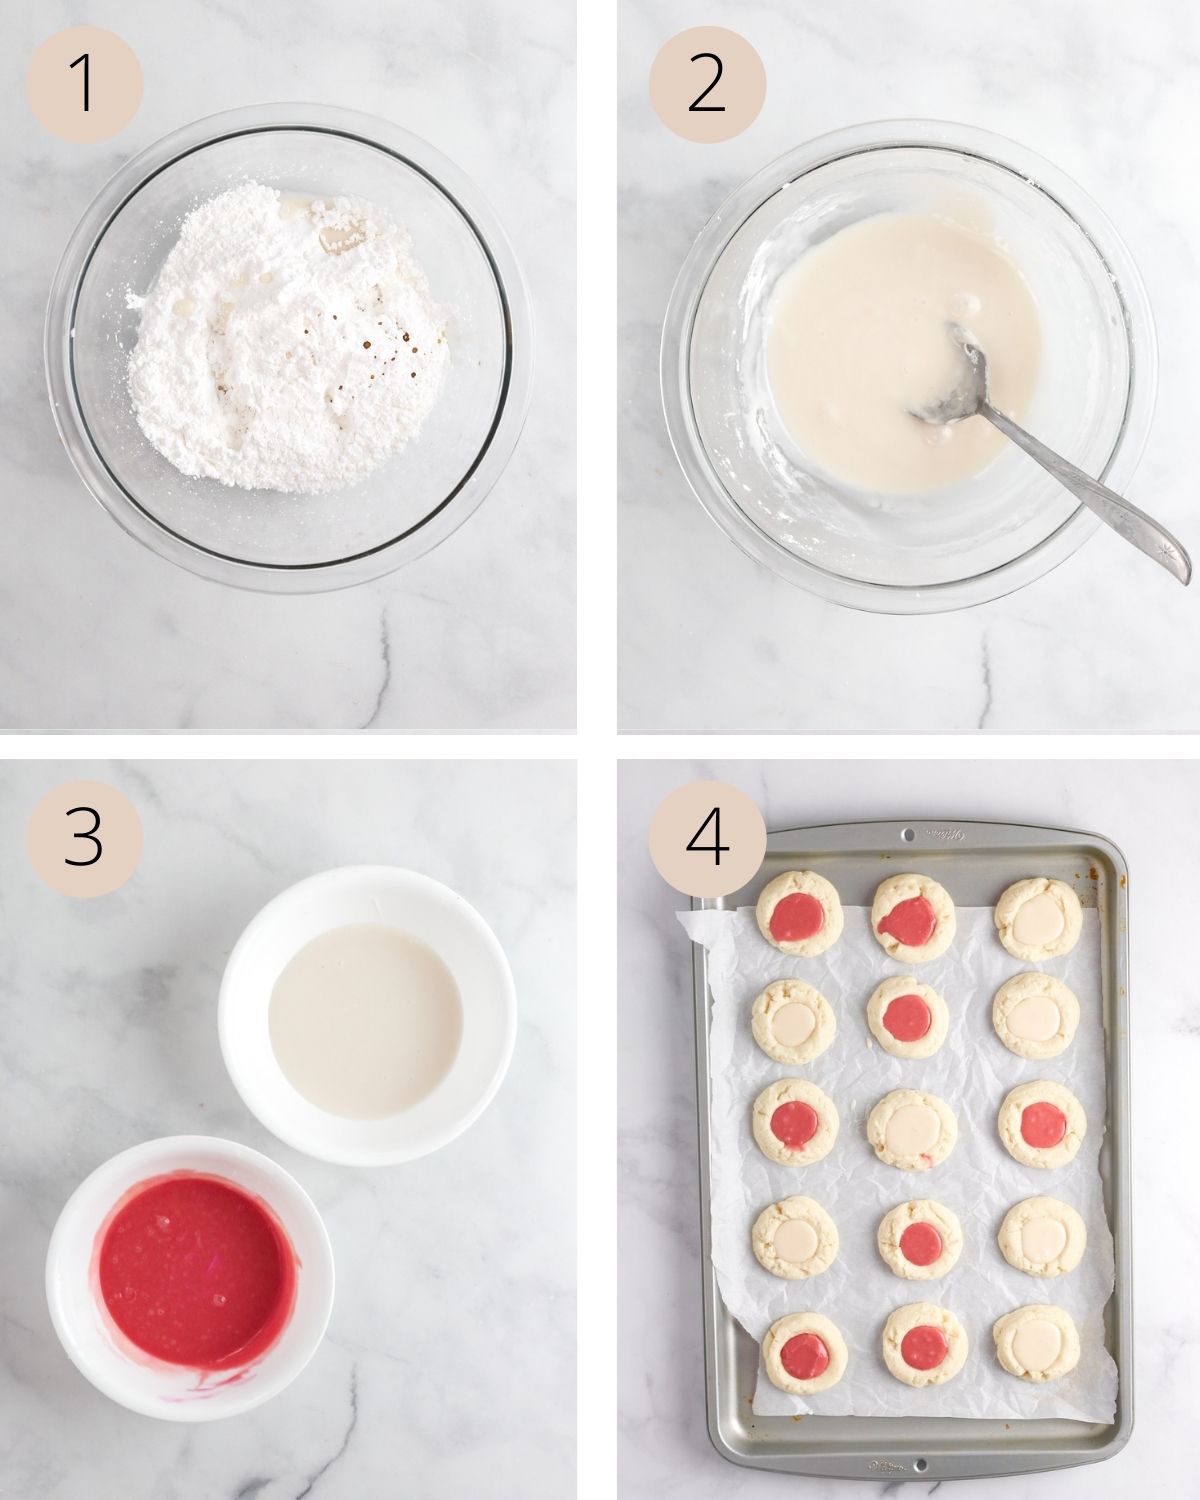
STEP 2: Divide and color the icing. Evenly divide the icing into small bowls; one bowl for each color of icing. Add natural food coloring or fruit juice to each bowl of icing, a little bit at a time, until the desired color is reached.
STEP 3: Add icing to the thumbprint cookies. Add the icing into piping bags with small tips, or use a spoon to add the icing into the center of each thumbprint cookie. Fill them until the icing is level and even with the tops of the cookies, but no more, or the icing will run out of the thumbprint and become messy.
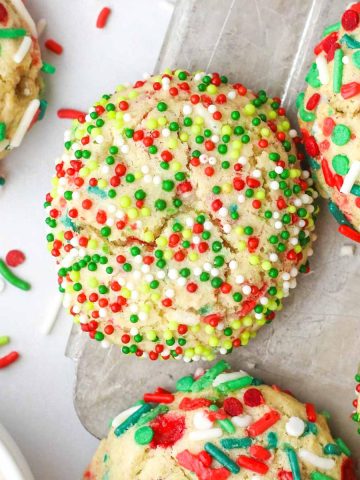
STEP 4: Top with sprinkles. While the icing is still wet in the thumbprint cookies, add your favorite sprinkles if desired. This is a fun and easy way to make the cookies festive for holidays, parties, and birthdays.
TIP: Let the icing set up in the cookies for at least 12 hours before stacking the cookies on top of each other to avoid the cookies sticking together.
Thumbprint Cookies With Buttercream Icing
This recipe makes a delicious, simple 2-ingredient vegan icing, but you can also fill the thumbprint cookies with buttercream icing. The icing process is largely the same.
To make strawberry buttercream icing for the thumbprint cookies, use this vegan buttercream recipe made with freeze-dried strawberries. You can halve the recipe to ensure you don't have too much left over.
To make chocolate buttercream icing for the cookies, try this vegan chocolate buttercream recipe that is made with cacao powder. Both buttercream icing recipes are gluten-free, dairy-free, and vegan and would be delicious in these thumbprint cookies.

Expert Baking Tips
- Don't overmix the cookie dough - It's important not to overmix the cookie dough. Even though these cookies don't contain gluten and won't become "tough" from overmixing, they can become "rubbery" if you overwork the gluten-free flour. Mix the dough until just combined.
- Properly measure the flour - Overmeasuring gluten-free flour will result in dry, crumbly cookies that are hard to work with. Be sure to weigh your flour using a baking scale, or use the spoon and level method to sprinkle flour into a measuring cup and level it off with a knife. This is the proper way to measure flour.
- Add a thumbprint twice - For the best thumbprint cookies, I recommend adding a thumbprint to the cookies before baking and doing so a second time when the cookies are warm out of the oven. This ensures the cookies have a well-defined thumbprint to hold the icing, preventing it from running off the cookies.
- Slowly add coloring to the icing - Add natural food coloring to the icing a little bit at a time until you get the perfect color. You can always add more color, but it's hard to take color away. I like using red and white icing colors for the perfect Christmas cookies or Valentine's Day cookies.
Icing Colors & Variations
There are so many ways to customize these thumbprint cookies with icing! Not only can you choose what colors to make, you can also customize the flavors:
- Lemon Icing - Add one teaspoon of lemon extract to the icing for a delicious, dairy-free lemon frosting for the thumbprint cookies.
- Orange Icing - Mix in one teaspoon of orange extract to the icing.
- Maple Icing - Use maple syrup in place of the plant milk for a sweet, maple icing flavor. Add a dash of cinnamon for an even cozier flavor, perfect for fall.
- Mint Icing - Add one teaspoon of pure mint extract to the icing if you want mint flavored thumbprint cookies. This is perfect for Christmas time!
To make the icing without any artificial colors or dyes, you have a few choices:
- Natural Food Coloring - Using natural food coloring is one of the easiest ways to color the icing. It is sold in small squeezable bottles just like normal food coloring, but they colors are derived from plants instead of fake, artificial dyes.
- Fruit Juice - You can make your own natural food coloring at home from fresh fruit! Use the juice from fresh blueberries or blackberries for a purple colored icing or use raspberries or strawberries for pink or red colored icing. You only need a little bit of fruit juice from mashed-up berries to give the icing a vibrant color.
- Freeze-Dried Fruit - Another way to color the icing is by using freeze-dried fruit powder, from strawberries, blueberries, or banana. Mix a small amount of powder into the icing at a time. This not only colors the icing, but adds fruit flavor, too.

Frequently Asked Questions
It's best to fill thumbprint cookies with icing after baking. Filling them before baking will result in a sticky, gooey mess in the oven because the icing will melt.
If your thumbprint cookies are crumbly, you might have overmeasured your flour, causing the cookies to be too dry. Be sure your gluten-free flour blend contains xanthan gum to help provide structure and elasticity in the cookies. If the cookie dough is too crumbly to form balls, you can add plant milk one teaspoon at a time until it is just moist enough to work with.
It's important to chill the cookie dough to keep thumbprint cookies from spreading while baking. Warm cookie dough will spread more than cool cookie dough. Especially with gluten-free cookies, the chilling step is especially important to allow the cookies to properly absorb the moisture.
Storing And Freezing
Let the iced thumbprint cookies set up for at least 8-12 hours before stacking them in storage containers. Then, place them in an airtight container with parchment paper between each layer. Store at room temperature for 5-7 days.
Can I freeze thumbprint cookies?
Yes, you can freeze thumbprint cookies by placing them in an airtight container with parchment paper between each cookie layer. Be sure to let the icing set up for at least 8-12 hours before freezing, or they will stick together and be hard to thaw.
Thumbprint cookies can keep in the freezer for 2-3 months. Let them thaw at room temperature for a few hours before enjoying again.
More Cookie Recipes


If you made these thumbprint cookies with icing, I would appreciate it if you would leave a rating and review below. If you post a photo on Instagram and tag me, I will happily share it. For more recipe inspiration, follow me on Pinterest and join my email list to stay updated with new recipes and exclusive content each week.
Recipe

Thumbprint Cookies With Icing
Equipment
- 1 Large Baking Sheet
- 2 Mixing Bowls
- 1 Cookie Scoop
- 1 Electric Hand Mixer or stand mixer
Ingredients
Gluten-Free Thumbprint Cookies
- ¾ cup vegan butter
- ½ cup vegan cane sugar
- 2 tablespoons unsweetened plant milk
- 1 teaspoon pure vanilla extract
- 2 cups gluten-free 1:1 flour with xanthan gum
- ½ teaspoon salt
Vegan Icing
- 1 ½ cups vegan powdered sugar
- 2 tablespoons unsweetened plant milk
- 1 teaspoon vanilla extract optional
- natural food coloring optional
Instructions
Making The Thumbprint Cookies
- Preheat the oven to 350 degrees Fahrenheit. Line a large baking sheet with parchment paper, then set aside for later.
- In a large bowl, use an electric hand mixer to beat together the vegan butter, cane sugar, plant milk, and vanilla extract until smooth and creamy.¾ cup vegan butter, ½ cup vegan cane sugar, 2 tablespoons unsweetened plant milk, 1 teaspoon pure vanilla extract
- At low speed, mix in the gluten-free flour and salt until a thick, sticky dough forms.2 cups gluten-free 1:1 flour, ½ teaspoon salt
- Chill the dough in the fridge for 30 minutes to allow the moisture to fully incorporate into the dough. This makes it easier to work with and prevents the cookies from spreading too much while baking.
- Use a small 1-inch cookie scoop to scoop the cookie dough into evenly-sized balls. Place them on the cookie sheet 1-2 inches apart. Use your thumb to create an indent in the center of each cookie.
- Bake the cookies for 12-14 minutes or until the edges have set up and become slightly golden (not brown). Remove from the oven and let them cool on the pan for 5-10 minutes before transferring to a cooling rack.
Filling Cookies With Icing
- To make the icing, whisk together the vegan powdered sugar and plant milk until a smooth and creamy mixture forms. It should be just thin enough to spoon into the cookies, but not runny.1 ½ cups vegan powdered sugar, 2 tablespoons unsweetened plant milk
- If coloring the icing, evenly divide the icing in separate bowls. Stir natural food coloring into each bowl to color the icing as desired.natural food coloring
- Use a piping bag or small spoon to add icing into the center of each thumbprint cookie. Be sure they are completely cool before adding the icing so it does not melt and run off. If desired, add your favorite sprinkles while the frosting is still wet.
- Allow the icing to set completely (12+ hours) before stacking them on top of each other. Then store them in an airtight container at room temperature to keep for 5-7 days.


Gabriela Herrera says
I just love the minimal ingredients in these thumbprint cookies. So simple to make and bursting with flavor.
Autumn says
I love these thumbprint cookies. Putting icing in the middle is such a great idea. I made mine with rainbow colors for a birthday party and they were such a hit! I had people asking for the recipe. So good!
nancy says
yummy cookies i'll take a dozen
Mallory says
Love these! I can’t wait to try all the flavors!
Shilpa says
So yumm.. and perfect texture! We loved it.
nancy says
these are the cutest cookies!!! my kid loves making these with me
Deb says
The lemon icing is calling my name but I see myself trying all the flavours sooner or later, these thumbprint cookies are fab!
Cindy Mom the Lunch Lady says
These cookies are so cute and so simple to make. Can't wait to surprise my sister with them!
nancy says
thanks for the easy to follow instructions!
Cindy Mom the Lunch Lady says
This version of thumbprint cookies looks so yummy! I love the drippy icing centers!
Sunshine says
Really easy dough, between a sugar cookie and a shortbread! great with a filling of raspberry jam. no adjustment needed for elevation 5600 ft.