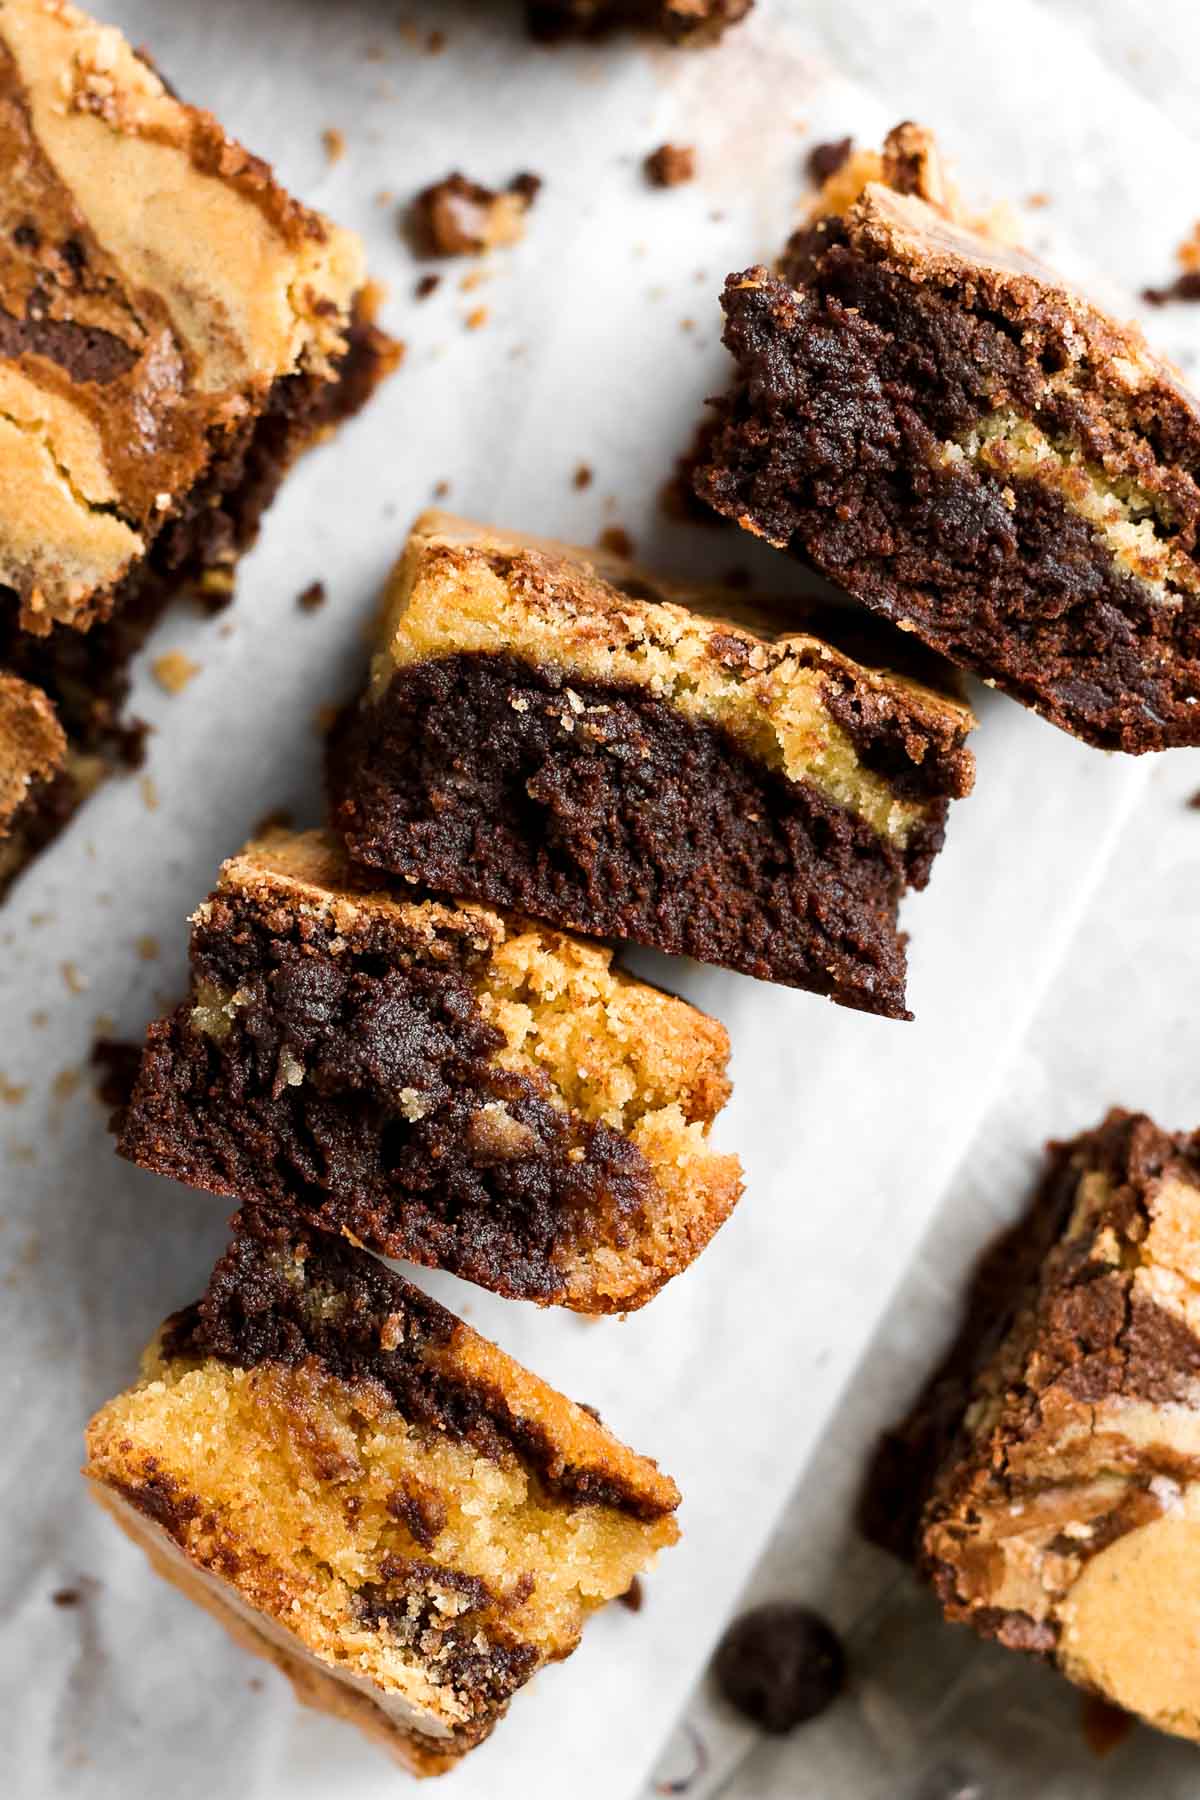
These gluten-free brownie blondies are a delicious, layered combination of buttery-caramel blondies and fudgy chocolate brownies. They are super moist and rich. Each bite melts in your mouth! The crackly tops of the bars show off a beautiful marbled pattern that is sure to impress. Not to mention the recipe is so easy to make!
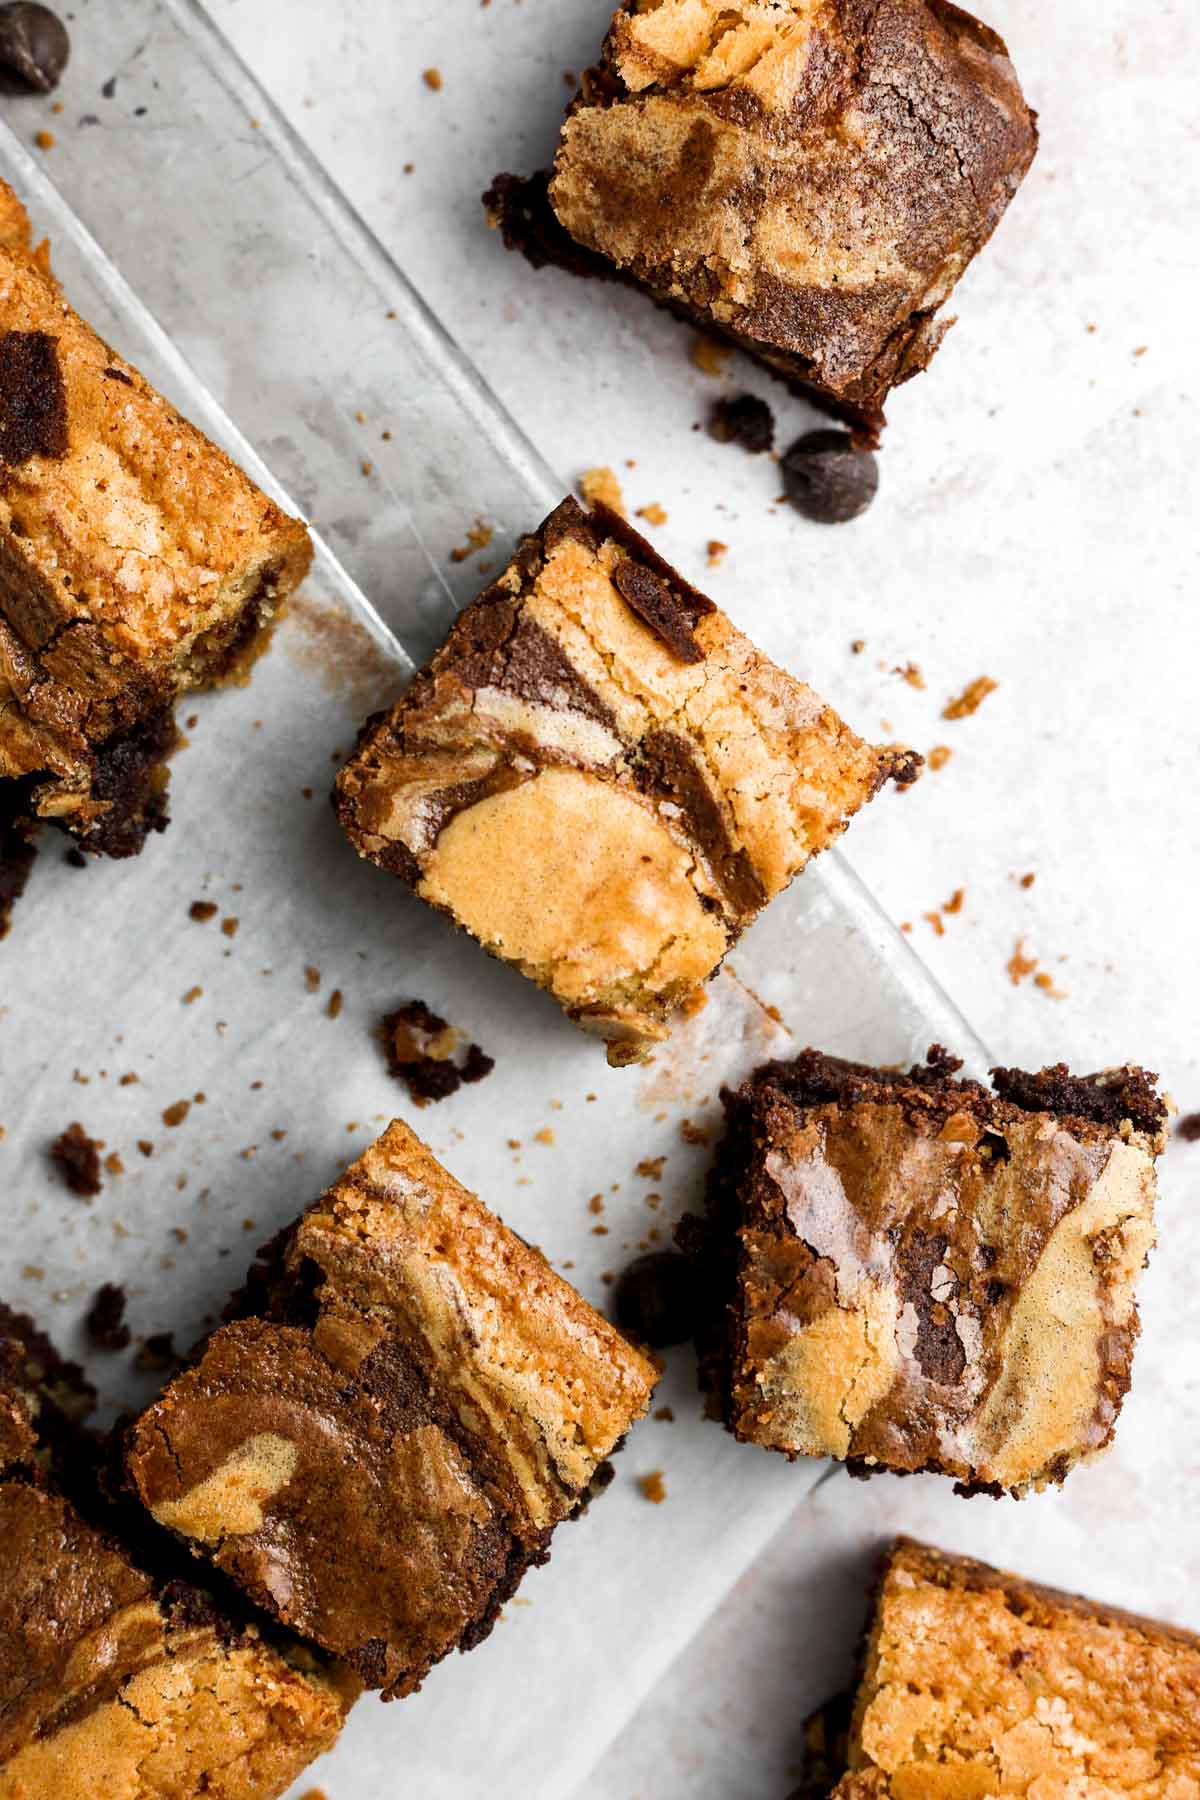
These brownie blondie bars make the perfect party dessert. Who doesn't love a rich, fudgy brownie? If you're not the biggest fan of chocolate, the blondie batter swirled throughout the bars adds a delicious caramel, butterscotch taste that you'll love!
If you love easy bar recipes, you have to try these dairy-free brownies after you make this recipe. Both options are delicious!
Jump to:
Why You'll Love This Recipe
- Gluten-free: These bars are gluten-free and safe for those with allergies or celiac.
- Easy to make: You don't need a mixer! The batter comes together quickly and easily with just a whisk.
- Crackly, marbled tops: The bars have the perfect crackly tops with a beautiful marbled swirl.
- 8 Ingredients: You don't need to go out and buy a lot of ingredients for this recipe. Simple is the way to go!
- Moist and fudgy: The brownie blondies are super moist, fudgy, and soft. They truly melt in your mouth.
What is a blondie brownie?
It's worth talking about what a "blondie brownie" is in case you have not heard of this dessert before. A blondie brownie is pretty much what it sounds like: a mixture of brownie batter and blondie batter to create a layered bar with both flavors.
The brownie and blondie batter is added to the baking pan in layers so each bar has distinctive bites of each flavor. Before baking, the top layer of the batter is gently swirled to give it a pretty marbled look. While the bars might appear fancy, they are quite easy and simple to make! This is a recipe that even beginner bakers can tackle.
Brownie And Blondies Difference
Brownies and blondies are both made from butter, eggs, flour, and sugar. The main difference is the addition of cacao powder in brownies to give them their rich chocolate flavor. Since blondies don't have cacao powder, they have a buttery, vanilla-caramel flavor. They are not as sweet as sugar cookie bars, but they are not chocolatey like brownies.
Brownies can have a fudgy or cakey texture, but the brownies in this recipe are very fudgy and moist. The blondies take on a delicious brown sugar flavor that pairs perfectly with the chocolate notes of the brownies.
Ingredient Notes
The ingredients for the brownie blondies overlap a lot, which means you only need a total of 8 ingredients to make the recipe. Below are helpful notes about the ingredients.

- Butter - Melted butter adds moisture and necessary fat. You can use dairy-free butter to make the recipe dairy-free.
- Brown Sugar - Light or dark brown sugar works well. Dark brown sugar has more molasses, which will give the bars a stronger caramel taste.
- Granulated Sugar - You can use granulated "white" sugar or cane sugar.
- Egg & Egg Yolk - The eggs and extra egg yolk give the bars their perfect crackly, shiny tops. They also contribute to the moist texture. I do not recommend substituting the eggs because they are necessary to bind the ingredients.
- Cacao Powder - I use unsweetened cacao powder (not cocoa powder) for the strongest chocolate flavor without added sugars. You can also use dutch-processed cocoa powder.
- Gluten-Free Flour - Use gluten-free 1:1 flour with xanthan gum. I use this Divided Sunset flour most often. You can use normal all-purpose flour if you are not gluten-free. White whole wheat flour can also be used with good results.
- Vanilla Extract - Vanilla enhances the flavors in the bars.
- Salt - Sprinkle some sea salt on top of the baked brownie blondies for a delicious touch!
Making The Brownies
Making the brownie batter is super easy and you don't need a mixer, just one bowl and a whisk. Here are step-by-step instructions for making the brownies:
STEP 1: Whisk together the melted butter, brown sugar, and granulated sugar in a large bowl until it becomes a paste-like texture that pulls away from the sides of the bowl.
STEP 2: Add the egg, egg yolk, and vanilla extract. Whisk until smooth and creamy.

STEP 4: Pour the gluten-free flour, cacao powder, and salt into the bowl.
STEP 5: Gently whisk the ingredients together until just combined. Be very careful not to over mix the batter! It will be quite thick.
Then, set the bowl aside while you make the blondies.
Making The Blondies
The blondie batter is just as easy to make as the brownies. Here are step-by-step instructions for making the blondies:
STEP 1: In a separate bowl, whisk together the melted butter, granulated sugar, and brown sugar. It may take 1-2 minutes for a paste-like texture to form.
STEP 2: Whisk in the egg, egg yolk, and vanilla extract until smooth and fluffy.
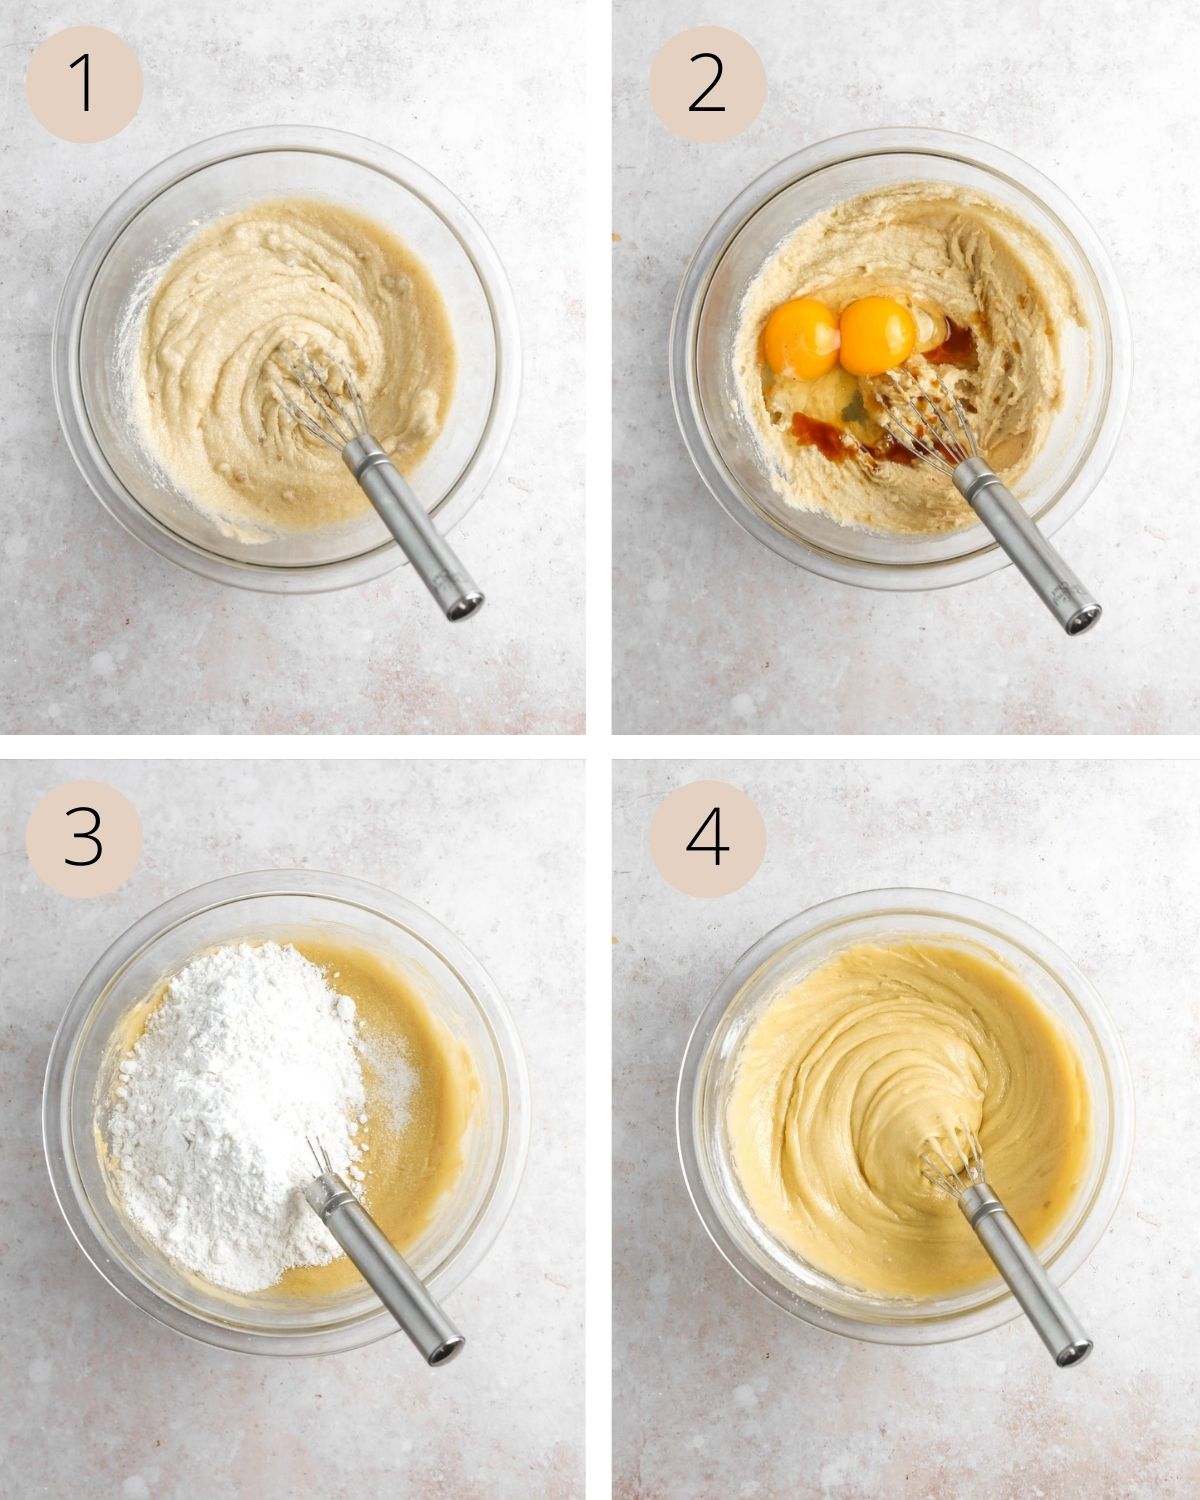
STEP 3: Then, add the gluten-free flour and salt to the bowl.
STEP 4: Whisk the flour and salt into the batter until evenly combined. Again, be careful not to over mix.
STEP 5: Set the bowl aside and then line an 8x8" baking pan with parchment paper. Be sure to leave some parchment paper hanging over the edges of the pan for easy removal of the brownie blondies after baking.
The Brownie Blondie Swirl
The key to creating the best brownie blondies is to layer the batters in the pan and avoid mixing them too much. Here are step-by-step instructions for getting the perfect marble swirl:
STEP 1: Start by adding a scoop of brownie batter into two opposite corners of the prepared baking pan.
STEP 2: Then, add a scoop of blondie batter into the opposite corners (without the brownie batter). Think of it like creating a checkerboard pattern. You may need to use the back of a spoon or spatula to gently encourage the thick batter into the corners, but be careful not to mix too much.

STEP 3: Alternate adding brownie batter and blondie batter in opposite sections of the pan. Try to avoid placing brownie batter over a layer of brownie batter, or blondie batter over a layer of blondie batter. Alternate the areas so you get nice layers of both batters in the bars.
STEP 4: Once all the batter has been added to the pan, use a spoon or butter knife to gently swirl the batters together to create a marble pattern on top. Be very careful not to swirl the batters too much! You want to have disctinctive areas of brownies and blondies, or else you lose the pattern after baking.
STEP 5: Bake the bars for 40-45 minutes at 350°F. The top should become shiny and crackly and the edges should turn golden brown, but not burnt. Remove the bars from the oven when a toothpick inserted in the center comes out with moist crumbs.
Allow the bars to cool in the pan for at least 30 minutes before lifting them out by the "handles" of the parchment paper. Then, cut the brownie blondies into 16 square pieces, or how many you prefer. Serve with some toppings, or enjoy as is!
Optional Toppings & Mix-Ins
- With Chocolate Chips - You can mix chocolate chips into the brownie batter before adding it to the pan, or add a sprinkle on top before baking.
- With Ice Cream - Serve the baked brownie blondies with a scoop of ice cream for a delicious treat! Vanilla, butter pecan, or chocolate ice cream would all be delicious.
- With Walnuts - Mix ½ cup chopped walnuts into the batter before baking. You may also add a sprinkle of walnuts on top, or use pecans instead!
- With Butterscotch Chips - Try adding butterscotch chips into the blondie batter before baking to enhance their buttery vanilla flavor!
- With M&Ms - Gently stir in ½ cup of M&Ms into the brownie or blondie batter. Remember to add some on top if you want to see them after baking!
- With Peanut Butter - Add ¼ cup creamy peanut butter to the brownie or blondie batter and drizzle some extra on top before baking.
If you love baking with peanut butter, give these 3-ingredient almond flour peanut butter cookies a try!
Expert Baking Tips
- Properly measure the flour - It's very important to "spoon and level" the flour to avoid dry bars. Don't pack the flour into the measuring cup!
- Don't overmix the batter - Overmixing the batter can result in crunchy, tough bars. To keep the soft, fudgy, and moist texture, mix the ingredients until just combined.
- Don't swirl too much! - If you swirl the batter too much, you won't get that distinct marble pattern. Be careful not to mix the batter in the pan more than necessary!
- Allow them to cool in the pan - Removing the bars from the pan while they are warm can cause them to crack and break. Let them cool in the pan before removing them.
- Slice the bars after cooling - For a clean cut, make sure to slice the bars after they are completely cool.
Frequently Asked Questions
A blondie is like a brownie without the chocolate. The brown sugar in them gives them a delicious caramely, butterscotch-like flavor. They are not too sweet. Think of them as tasting like a chewy chocolate chip cookie without chocolate!
If you're not a huge fan of chocolate, then you might like blondies better than brownies. However, if you're a chocolate lover, you might prefer a fudgy chocolate brownie. This is up to personal preference!
Blondies should be soft and chewy in the center, but not gooey or runny. If your blondies are too gooey, they might be underbaked.
The key to the perfect swirl is not overmixing the batters. Keep distinctive brownie and blondie "sections" in the pan and don't swirl them too much, or you will lose the marbled pattern.
Unforunately, I don't recommend making the recipe vegan because the eggs are important to hold the bars together, add moisture, and give them shiny, crackly tops. I have not tested the recipe without the eggs, but if you try it, please let me know how they turn out!

Storing & Freezing
Store leftover bars in an airtight container at room temperature for 5-7 days. It is important to keep them in an airtight container to prevent them from drying out and becoming hard. Then, you can reheat them in the microwave for a few seconds to enjoy them warm!
To freeze the brownie blondies, store them in an airtight container with parchment paper between each layer. They can keep in the freezer for 2-3 months. Let them thaw at room temperature for a few hours before enjoying again.
More Easy Chocolate Recipes


Did you make these gluten-free brownie blondies? Please remember to leave a star rating and review below. This really supports my blog and helps other readers! If you post a photo on Instagram and then tag me, I would love to share what you made. To keep up with the newest recipes, follow me on Pinterest and join my email list.
Recipe

Brownie Blondies (Gluten-Free)
Equipment
- 2 Large Mixing Bowls
- 1 Whisk
- 1 8x8" Baking Pan
- Parchment Paper for lining the pan
Ingredients
Brownie Layer
- ½ cup unsalted butter, melted can sub vegan butter
- ½ cup brown sugar light or dark
- ⅔ cup granulated sugar
- 1 large egg
- 1 egg yolk
- 2 teaspoons pure vanilla extract
- ½ cup gluten-free all-purpose flour with xanthan gum or all-purpose flour
- ½ cup unsweetened cacao powder
- ¼ teaspoon salt
Blondie Layer
- ½ cup unsalted butter, melted can sub vegan butter
- ⅔ cup brown sugar light or dark
- ½ cup granulated sugar
- 1 large egg
- 1 egg yolk
- 1 teaspoon pure vanilla extract
- 1 cup gluten-free all-purpose flour with xanthan gum or all-purpose flour
- ¼ teaspoon salt
Instructions
Making The Brownies
- In a large mixing bowl, whisk together the melted butter, brown sugar, and granulated until evenly combined. The mixture should resemble a paste, like wet sand. This takes 1-2 minutes.½ cup unsalted butter, melted, ½ cup brown sugar, ⅔ cup granulated sugar
- Add the egg, egg yolk, and vanilla extract to the bowl. Whisk thoroughly until smooth.1 large egg, 1 egg yolk, 2 teaspoons pure vanilla extract
- Pour the gluten-free flour, cacao powder, and salt into the bowl. Mix gently until the ingredients are just combined. Be careful not to over mix the batter! It will be quite thick. Set the bowl aside while you make the blondies.½ cup gluten-free all-purpose flour with xanthan gum, ¼ teaspoon salt, ½ cup unsweetened cacao powder
Making The Blondies
- Preheat the oven to 350°F and line an 8x8" square baking pan with parchment paper. Leave some parchment paper hanging over the sides to make it easy to remove the brownie blondies later.
- In a separate large bowl, whisk together the melted butter, brown sugar, and granulated sugar until it resembles a sandy, paste-like texture.½ cup unsalted butter, melted, ⅔ cup brown sugar, ½ cup granulated sugar
- Add the egg, egg yolk, and vanilla extract to the bowl. Whisk until smooth and creamy.1 large egg, 1 egg yolk, 1 teaspoon pure vanilla extract
- Pour the gluten-free flour and salt into the bowl. Mix gently until just combined. Again, be careful not to over mix the batter.1 cup gluten-free all-purpose flour with xanthan gum, ¼ teaspoon salt
Creating The Swirl
- Use a measuring cup or large spoon to scoop about ¼ cup of brownie batter into two opposite corners of the pan (diagonal from each other). Then, scoop about ¼ cup of blondie batter into the remaining two corners of the pan, also opposite each other. (See process pictures in the blog post for clarity).
- Next, add a scoop of brownie batter on top of the corners with the blondie batter. Add a scoop of blondie batter on top of the corners with brownie batter. Repeat this process, adding brownie batter over blondie batter, and vice versa, until all the batter is gone. Think of it like creating a checkerboard pattern.
- Use the back of a spoon or a spatula to gently "swirl' the top layer of the brownie blondies to create a marble pattern. Be careful not to swirl too much, or the mixtures will blend together and not have a distinctive marble pattern!
- Bake for 40-45 minutes, or until a toothpick inserted in the center comes out with a few moist crumbs. Allow the bars to cool in the pan for 30 minutes. Then, use the edges of the parchment paper to lift the brownie blondies out of the pan.
- Once cool, slice into 16 square bars. Serve and enjoy!

My new FAVORITE recipe!! These bars are literally sooo good, I was so impressed. The layers of chocolate with the vanilla blondies is so yummy and I love that they're different than the basic, normal brownies. I used gluten-free all-purpose flour and mixed in some chocolate chips. They were a HIT! We could not stop eating them!! Thank you for the recipe, I'll be making it again soon!
So these bars are truly amazing! the flavor is everything and they are such a great gluten free dessert, i truly make this ALL the time!
But…. that bake time is a joke LOL. looking at more like 1hr15 or so. every toothpick check, expect something to come out with it. it’s frustrating at first so saving someone else rhe surprise.